[KR] How does Spring work? - Deep Research of Spring

TL;DR


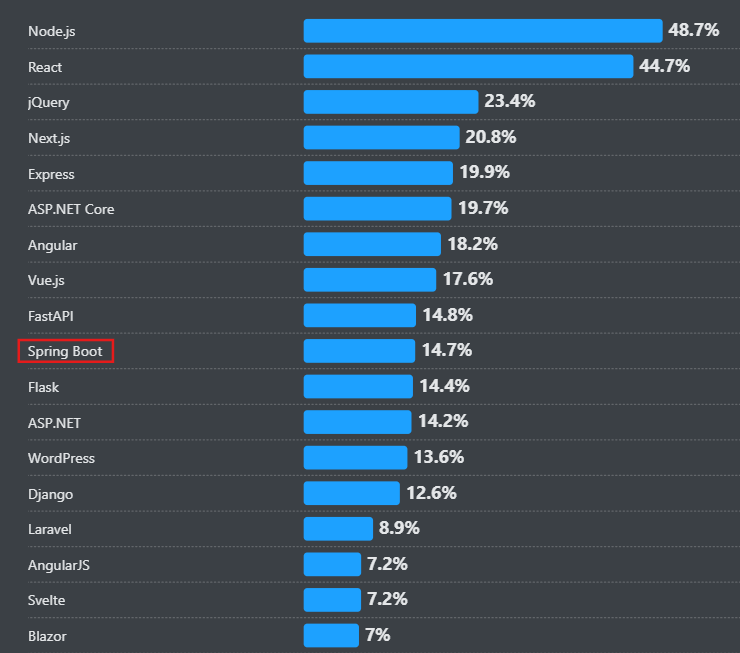
Spring은 JVM 위에서 동작하는 웹 애플리케이션 프레임워크 생태계이다. 처음으로 공개된 건 2003년 Apache 2.0 License로 Spring 1.0 버전이 공개되었으며 당시 J2EE/EJB의 복잡성과 생산성 문제를 비판, 대안하기 위해 제시되었다. 이후 Spring에 여러 릴리즈와 기술이 추가되면서 빠르게 성장했으며 특히 한국에서는 다수의 기업들이 Spring 프레임워크를 사용하며 가장 많이 사용되는 웹 프레임워크 중 하나로 자리매김했다.

2025 StackOverFlow Web Frameworks Survey

2025 StackOverFlow Web Frameworks Survey

Spring은 자체적으로 여러 보안 관련 기술을 제공한다. 특히 Spring Security가 기반이 되며 인증/인가 제어, XSS 방어, CSRF 보호화 등 여러 기업이 사용하기 편하도록 다양한 보안 정책을 활용하고 있다. 이 때문에 해커들의 입장에서는 Spring 기반 서비스를 공격하기가 까다로운 편이다. 다른 프레임워크들에 비해 공격 벡터가 적을 뿐더러 취약점도 찾기 힘들기 때문이다. Rewrite는 해당 연구를 통해 Spring의 작동 방식에 대해 살펴보고 최근 CVE를 조사 및 분석하여 기존의 공격 시나리오들을 파악하고 새로운 Attack Vector까지 파악해보고자 한다.

Spring vs Spring boot vs Spring Security


Spring

배경

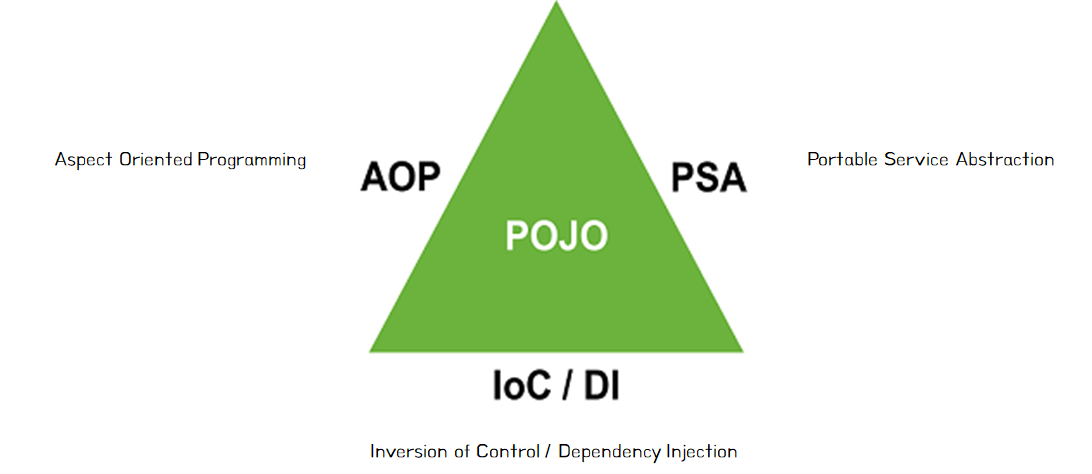
Spring은 Java/Kotlin 애플리케이션을 위한 경량 IoC컨테이너이자 종합 애플리케이션 프레임워크로 POJO(Plain Old Java Objects)를 기반으로 애플리케이션을 구축하며 복잡한 코드를 제거하여 코드의 복잡성을 낮출 수 있는 오픈소스 프레임워크이다. 의존성 주입과 AOP를 바탕으로 객체 간의 결합도를 낮추고 유지보수성과 테스트 용이성을 확보하는 것을 목적으로 한다. 아래 챕터에선 Spring의 구성요소를 설명한다.

구성요소 및 특징

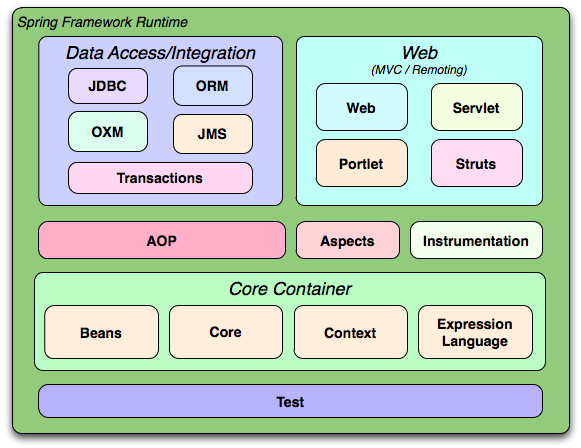
Spring 프레임워크는 약 20개의 모듈로 구성된 기능들로 이루어져 있다. 각 모듈을 Tree 형태로 구성하면 다음과 같다.

1
2
3
4
5
6
7
8
9
10
11
12
13
14
15
16
17
Spring Framework
├── Core Container
│ ├── Beans
│ ├── Core
│ ├── Context
│ └── Expression Language (SpEL)
├── Data Access / Integration
│ ├── JDBC
│ ├── ORM
│ ├── JMS
│ └── Transactions
├── Web
│ ├── Web (Servlet 기반)
│ ├── Web MVC
│ └── WebSocket, WebFlux 등
├── AOP (Aspect Oriented Programming)
└── Testing

주요 모듈 계층 구조의 도식화

주요 모듈 계층 구조의 도식화

Core Container(코어 스프링)

코어 컨테이너는 Core, Beans, Content, Expression Language 모듈로 구성된다.

Core, Beans

  • IoC 및 DI 등 프레임워크의 핵심적인 기능을 제공
    • IOC : Inversion Of Control, 생명주기 제어 주체의 역전
    • DI : Dependency Injection, 의존성 주입. 다른 의존성(객체, 클래스 등)을
      주입받는 것(Class-In-Class)

Context

Core와 Beans 모듈이 제공하는 견고한 기반 위에서, 프레임워크의 일관된 API를 통해 객체를 손쉽게 조회할 수 있는 수단을 제공한다. 이는 JNDI 레지스트리 방식과 유사하다.

1
DataSource ds = (DataSource) ctx.lookup("java:/comp/env/jdbc/MyDB"); // 기존 JNDI

Spring ApplicationContext

1
2
ApplicationContext ctx = …;
UserService svc = ctx.getBean("userService", UserService.class);

Expression Language

SPEL은 표현식 모듈로 런타임에 객체 그래프를 탐색, 조작을 하거나 속성 값 설정 및 가져오기, 속성 할당, 컨텍스트 지원, Spring IoC컨테이너에서 이름으로 객체 검색 등을 지원한다.


Data Access / Integration

데이터 접근/통합 계층은 JDBC, ORM OXM, JMS 및 트랜잭션 모듈로 구성된다.

JDBC 추상화 계층 제공

  • JdbcTemplate 같은 추상화 계층을 제공하여 템플릿 메서드 패턴을 제공해 반복 코드를 줄여줌
  • DBMS마다 다른 오류 코드를 공통된 예외 클래스로 변환해 일관성 있게 처리할 수 있도록 함

ORM

  • 객체-관계 매핑 API에 대한 통합 계층을 제공

OXM

  • 객체/XML 매핑 구현을 지원하는 추상화 계층을 제공

JMS

  • 메시지를 생성하고 사용하는 기능을 제공

Transaction 모듈

  • 특수 인터페이스를 구현하는 클래스와 모든 POJO에 대한 프로그래밍 방식 및 선언적 트랜잭션 관리에 있어 일관된 추상화를 제공
  • DataAcssessException 예외 계층 구조와 트랜잭션 동기화 저장소 JCA기능을 제공

AOP / Instrumentation

AOP

  • 스프링은 AOP모듈을 통해 관점 지향 프로그래밍을 풍부하게 지원하고 객체 간의 결합력을 낮추게 도움
  • Method-interceptors, pointcuts을 이용하여 분리 작성

Instrumentation

  • JVM에 에이전트를 추가하는 기능을 제공
  • 톰캣용 위빙 에이전트를 제공, 톰캣은 클래스 로더 되는 클래스 파일을 변환하는 역할을 함

Web(MVC / Remoting)

Web 계층은 Web, Web Servlet, Web Struts, Web Portlet으로 구성된다.

Web

  • Web모듈에서는 멀티파트 파일 업로드 기능, Servelt Listener, 웹 지향 어플리케이션 컨텍스트를 사용한 IoC컨테이너 초기화 등의 기본적인 웹 통합 기능을 제공

Web Servlet

  • Spring의 MVC구현을 포함

Web Struts

  • Spring에서 클래식 Struts 웹 레이어를 불리기 위한 지원 클래스(3.0부터 지원 중단)

Web Portlet

  • Portlet환경에서 사용되는 MVC 구현 제공
  • 웹 Servlet 모듈의 기능을 반영

POJO (Plain Old Java Objects)

POJO는 프레임워크 기능은 아니나 Spring이 지향하는 개발 모델의 핵심이라고 할 수 있다. Spring의 가장 큰 특징이 POJO 프로그래밍을 가능케 해주는 것이라 할 수 있으니, Spring의 전신이라고도 볼 수 있다.

POJO

  • 특별한 규약이나 상속, 어노테이션이 거의 없는 순수한 자바 객체를 의미
  • public class 형태의 일반 클래스
  • POJO 프로그래밍을 위해 IoC/DI, AOP, PSA가 지원된다.

image.png

IoC(Inversion of Control)

  • 애플리케이션 흐름을 프레임워크가 주도하고 개발자는 비즈니스 로직에만 집중하도록 하는 설계 원칙
1
2
Service s = new Service(new Dao());  // 내가 new 로 의존 객체 준비
s.process();

원래라면 위처럼 new를 사용하여 사용할 객체를 직접 생성해야 하지만

1
2
3
4
5
6
@Component
class Service {
private final Dao dao;
Service(Dao dao) { this.dao = dao; } // 의존성만 선언
}

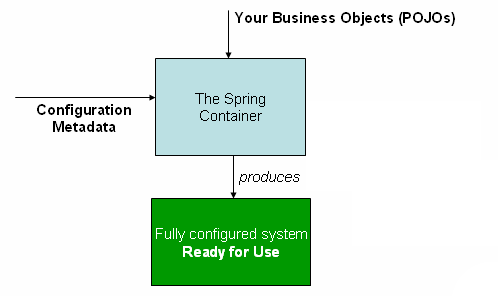
위와 같이 IoC를 적용하면 생성자를 통해 의존성만 선언할 수 있다. 즉, IoC는 개발자가 아닌 스프링이 특정 클래스가 사용할 객체를 생성하여 의존 관계를 맺어주는 것이다.

Spring IoC 컨테이너

Spring IoC 컨테이너

DI(Dependency Injection)

  • DI는 위에서처럼 객체의 의존 객체를 직접 생성하지 않고 외부에서 주입하여 전달하는 설계 기법
  • IoC원칙을 구현하기 위해 DI라는 메커니즘을 사용

AOP (Aspect Oriented Programming)

  • 핵심 로직과 공통 로직을 분리해두고, 런타임에 프록시나 바이트코드 조작을 통해 원하는 지점에 자동 삽입
  • 이를 위해 공통 관심 사항과 관련된 기능들을 별도의 객체로 분리
  • 개발자는 핵심 로직만 깔끔하게 작성하고, 공통 로직은 분리된 Aspect에서 일괄 관리

PSA (Portable Service Abstraction)

  • 기존 데이터베이스를 다른 데이터베이스로 변경 할 시 Spring에서는 동일한 사용방법을 유지한 채로 데이터베이스를 바꿀 수 있음
  • 이는 스프링이 서비스를 추상화한 인터페이스를 제공했기 때문인데 이를 JDBC라고 칭함
  • 각 데이터베이스를 만드는 회사는 JDBC를 기반으로 코드를 작성하는데 이처럼 서비스를 추상화하여 일관된 방식으로 사용할 수 있게 한 것을 PSA라고 칭함

Spring Boot

배경

Spring Boot는 자동 설정과 내장 톰캣(Tomcat) 등의 런처를 통해 애플리케이션을 즉시 실행할 수 있는 환경을 제공한다. 반면 기존 Spring Framework는 애플리케이션 컨텍스트, 서블릿 설정, 의존성 관리 등을 개발자가 직접 구성해야 했으므로 초기 개발 진입 장벽이 높았다. Spring Boot는 이러한 진입 장벽을 없애고 사람들이 Spring 환경 세팅을 좀 더 편하게 할 수 있도록 여러 개발 편의성을 제공한다. 사실상의 Spring boot는 Spring으로 애플리케이션을 만들 때에 필요한 설정을 간편하게 처리해주는 별도의 프레임워크라고 볼 수 있다.

구성요소 및 특징

  • 자동 설정 : 개발자가 명시적으로 설정하지 않아도 대부분 자동 구성
  • 스타터 종속성 : 특정 목적의 기능들을 묶어둔 의존성 패키지
  • 내장 톰캣 : 톰캣, Jetty등을 내장하여 WAR 배포 없이 독립 실행 가능
  • Production-ready Actuator : Health check, 로그조회 등의 운영 도구 제공
  • application.yml, application.properties등을 통한 빠른 설정 가능

Spring Security

배경

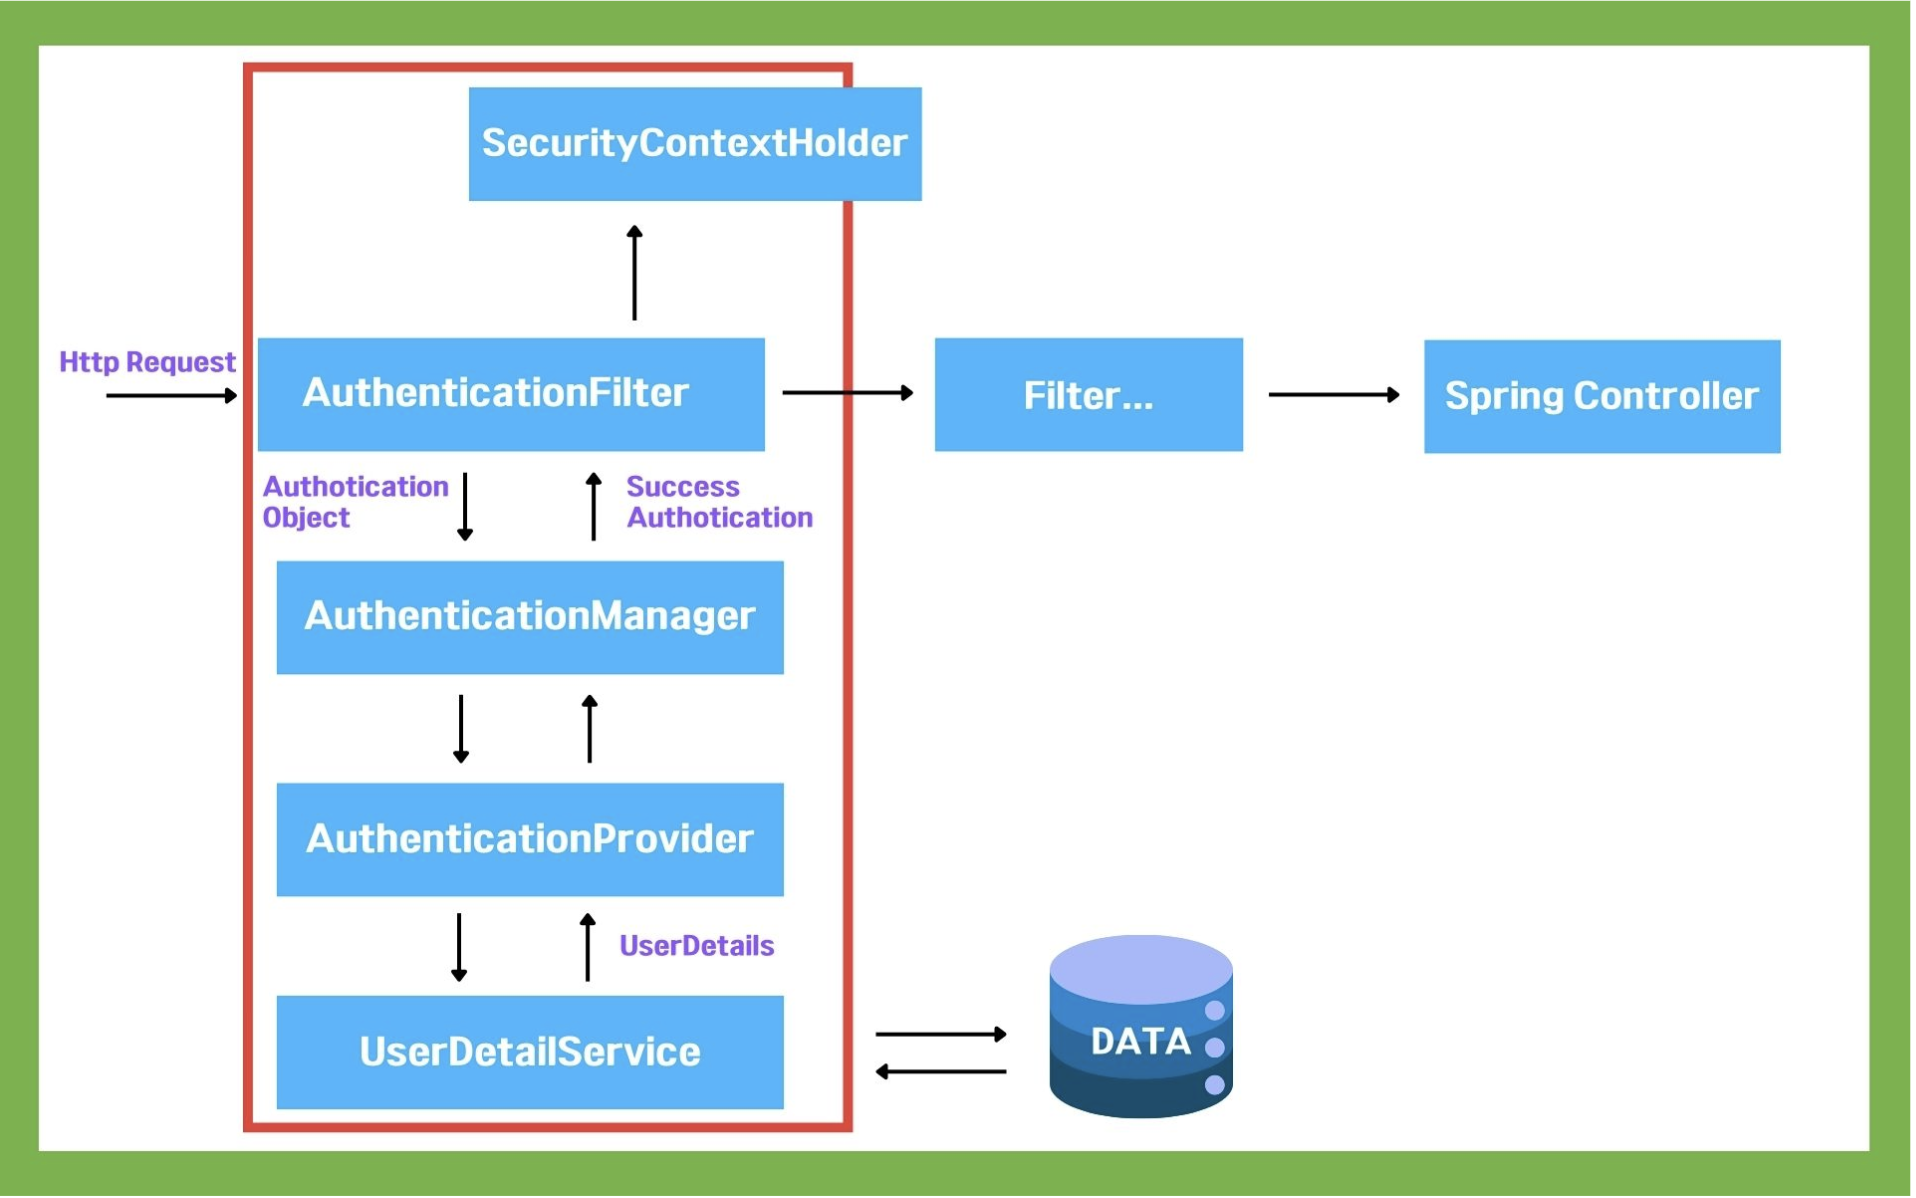
Spring Security는 Spring 애플리케이션에 인증(Authentication)과 인가(Authorization) 기능을 부여하기 위한 보안 프레임워크이다. 인증/인가 개발 패턴을 기능으로써 지원하며, 세션 기반 로그인, OAuth2, JWT 같은 다양한 인증 방식을 손쉽게 적용할 수 있다. 또한 URL 접근 제어, 메서드 단위 권한 검사, CSRF 방어, 보안 헤더 설정 등 웹 애플리케이션 보안에 필요한 핵심 기능을 제공한다. 이러한 특징 덕에 Spring 애플리케이션의 보안성을 높이기 위해 거의 필수적으로 도입되곤 한다. 그러나 보안을 위해 도입한 프레임워크에서 역으로 취약점이 발생하기 도하는데, 이는 CVE 챕터에서 다룰 예정이다.

구성요소 및 특징

  • Authentication / Authorization : 인증 및 인가
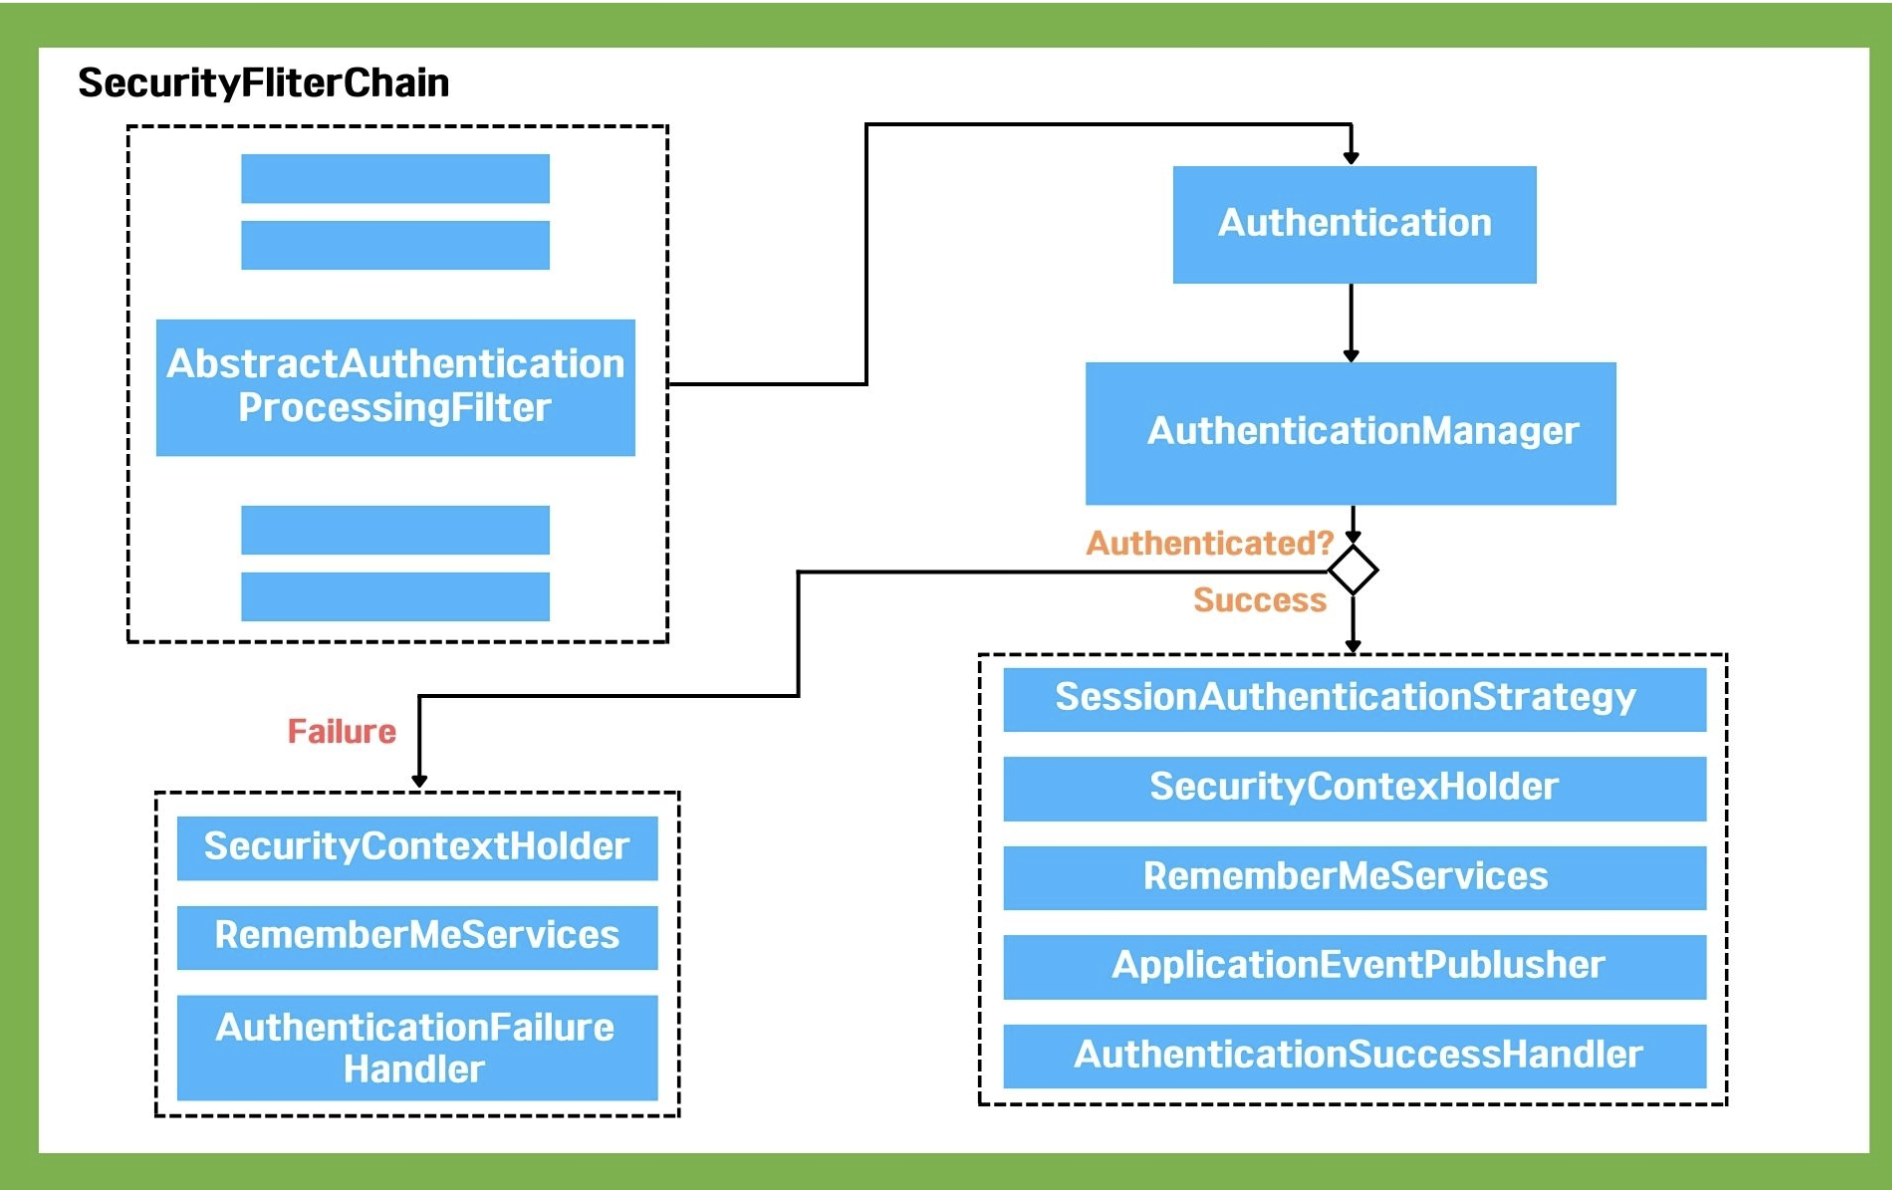
  • Filter : Middleware 와 유사함 | 서블릿 필터로 요청/응답 흐름에 개입 | 서블릿 컨테이너 레벨에서 동작FilterChain 기반으로 순차 실행
  • SecurityContextHolder : 현재 사용자의 보안 컨텍스트 저장
  • PasswordEncoder : Bcrypt 등 패스워드 암호화 수행
  • UserDetails / UserDetailsService : 사용자 정보 조회를 위한 인터페이스
  • CSRF, CORS, Session : 기본적인 웹 보안 설정 지원

또한 Spring Security는 아래 4가지 핵심 개념을 기반으로 구축되었다.

  • 인증
  • 권한 부여
  • 비밀번호 저장
  • 서블릿 필터

Spring Security를 사용하기 위해선 pom.xml에 아래와 같은 종속성을 추가하면 된다. (Maven 기준)

1
2
3
4
<properties>
<spring-security.version>6.4.0</spring-security.version>
<spring.version>6.1.0</spring.version>
</properties>
1
2
3
4
<dependency>
<groupId>org.springframework.security</groupId>
<artifactId>spring-security-core</artifactId>
</dependency>

아래는 Spring Security의 아키텍처 도식화이다.

image.png

아래는 Spring Security의 내부 구조 도식화이다.

image.png

Spring Build


Spring은 여러 빌드 도구를 사용하여 간편하게 빌드할 수 있다. 특히 애플리캐이션을 개발하면서 다양한 외부 라이브러리를 다운받을 상황이 많은데 빌드 도구를 사용하면 각 라이브러리 종류와 버전을 명시만 해줌으로써 자동으로 다운로드 받아 간편히 관리할 수 있다(like Python pip). 이때 가장 많이 사용되는 것이 Maven과 Gradle이며 해당 챕터에서 두 도구에 대해 설명을 하고 각각의 Build방법에 대해 소개하겠다.

Maven

Maven은 Apache에서 만든 전통적인 빌드/프로젝트 관리 도구로 선언형 xml(pom.xml) 기반이다.

생태계가 오래되어 플러그인이나 레퍼런스가 많다는 장점이 있으며 XML기반으로 설정이 장황할 수 있지만 대규모 기업 프로젝트에서 여전히 많이 사용되곤 한다. 아래는 pom.xml 파일의 예시이다.

1
2
3
4
5
6
7
8
9
10
11
12
13
14
15
16
17
18
19
20
21
22
23
24
25
26
27
28
29
30
31
32
33
34
35
36
37
38
39
40
41
42
43
44
<project xmlns="http://maven.apache.org/POM/4.0.0"
xmlns:xsi="http://www.w3.org/2001/XMLSchema-instance"
xsi:schemaLocation="http://maven.apache.org/POM/4.0.0
http://maven.apache.org/xsd/maven-4.0.0.xsd">

<modelVersion>4.0.0</modelVersion>

<groupId>com.example</groupId>
<artifactId>demo</artifactId>
<version>0.0.1-SNAPSHOT</version>
<packaging>jar</packaging>

<name>demo</name>
<description>Spring Boot with Maven Example</description>

<parent>
<groupId>org.springframework.boot</groupId>
<artifactId>spring-boot-starter-parent</artifactId>
<version>3.2.5</version>
<relativePath/> <!-- lookup parent from repository -->
</parent>

<properties>
<java.version>17</java.version>
</properties>

<dependencies>
<!-- Spring Web -->
<dependency>
<groupId>org.springframework.boot</groupId>
<artifactId>spring-boot-starter-web</artifactId>
</dependency>
<build>
<plugins>
<!-- Spring Boot Maven Plugin -->
<plugin>
<groupId>org.springframework.boot</groupId>
<artifactId>spring-boot-maven-plugin</artifactId>
</plugin>
</plugins>
</build>

</project>

Maven은 아래와 같은 명령어로 빌드 및 실행이 가능하다.

1
2
3
mvn clean package -DskipTests # 테스트 실행 생략 후 빌드
mvn clean install # 깨끗하게 빌드 후 로컬 저장소에 설치
mvn spring-boot:run # Maven플러그인으로 바로 실행

Gradle

Gradle은 Groovy / Kotlin DSL(Domain-Specific-Language)기반의 빌드 도구로 DSL문법을 사용함으로써 xml을 사용하는 Maven보다 훨씬 간결하고 성능 최적화와 유연성이 뛰어나다는 장점이 있다. 최근 Spring Boot의 기본 디폴트로 많이 사용되며 캐시나 Incremential build를 사용하여 빌드 속도가 빠르다는 장점이 있다.

1
2
3
4
5
6
7
8
9
10
11
12
13
14
15
16
17
18
19
20
21
22
23
24
25
plugins {
id 'org.springframework.boot' version '3.2.5'
id 'io.spring.dependency-management' version '1.1.4'
id 'java'
}

group = 'com.example'
version = '0.0.1-SNAPSHOT'
sourceCompatibility = '17' // 자바 버전

repositories {
mavenCentral() // 의존성 받을 저장소
}

dependencies {
implementation 'org.springframework.boot:spring-boot-starter-web' // Spring Web
implementation 'org.springframework.boot:spring-boot-starter-data-jpa' // JPA
runtimeOnly 'com.h2database:h2' // H2 DB
testImplementation 'org.springframework.boot:spring-boot-starter-test'
}

tasks.named('test') {
useJUnitPlatform() // JUnit5 기반 테스트 실행
}

Gradle의 빌드와 설치 단계는 아래와 같다.

1
2
./gradlew build
./gradlew bootRun

Spring Build Toop Option (feat. Gradle)

Spring Build 도구들은 여러 구성옵션을 제공한다. Gradle에서 사용하는 여러가지 의존성 관련 옵션이 있으며 대표적으로 다음과 같은 것들이 있다.

ClassPath 종류

compileClasspath

  • 프로젝트 소스 코드를 컴파일하는 동안 필요한 모든 클래스 파일과 라이브러리를 포함
  • 코드 작성/컴파일할 때 참조만 하고, 실행 시에는 포함되지 않을 수 있음

runtimeClassPath

  • 프로젝트를 실행할 때 필요한 모든 클래스 파일과 라이브러리를 포함
  • 실행할 때 JVM이 실제로 로드해야 하는 라이브러리들

일반적으로 compileClasspath에는 runtimeClasspath에 포함되는 대부분의 의존성이 포함되어 있다.

testCompileClassPath

  • 테스트 코드 컴파일 시 필요한 의존성

testRuntimeClassPath

  • 테스트 실행 시 필요한 의존성

dependencies Option

implementation

  • 컴파일 및 실행 시 필요한 라이브러리
  • 프로젝트 빌드 시점에 해당 라이브러리를 컴파일에 사용하고 빌드된 결과물에도 포함
  • 본인의 모듈을 의존하는 다른 모듈로는 노출되지 않음 (internal)
1
2
3
dependencies {
implementation 'com.google.guava:guava:33.2.1-jre'
}

api

  • 공개 API에 포함되는 의존성
  • 본인의 모듈을 의존하는 다른 모듈에도 노출됨(public)
  • 의존 라이브러리 수정시 본 모듈의 의존하는 모듈들도 재빌드
1
2
3
4
5
6
7
8
9
10
// :core 모듈
dependencies {
api 'org.apache.commons:commons-lang3:3.14.0'
}

// :app 모듈 (core 의존)
dependencies {
implementation project(':core')
// 별도 선언 없이도 :app에서 StringUtils 등 사용 가능(전이)
}

runtimeOnly

  • 실행 시에만 필요한 라이브러리 (빌드 시점에 해당 라이브러리를 클래스 패스에 추가X)
  • 컴파일 시에는 참조할 필요 없음
  • ex) JDBC 드라이버
1
2
3
4
5
dependencies {
implementation 'org.springframework.boot:spring-boot-starter-data-jpa'
// postgresql은 실행할때만 실제 드라이버가 클래스패스에 올라오면 됨
runtimeOnly 'org.postgresql:postgresql:42.7.3'
}

compileOnly

  • 컴파일에만 필요, 런타임에는 없어도 되는 의존성
  • 컴파일 시에만 빌드하고 빌드 결과물에는 포함하지 않음
1
2
3
4
dependencies {
// (서블릿 앱이라면) 컨테이너가 제공
compileOnly 'jakarta.servlet:jakarta.servlet-api:6.0.0'
}

Build 과정

Spring 애플리케이션을 빌드 및 실행하기 위한 명령어는 다음과 같다.

1
./mvnw spring-boot:run

아래는 명령어의 실행 결과이다.

1
2
3
4
5
6
7
8
9
10
11
12
13
14
15
16
17
18
19
20
21
  .   ____          _            __ _ _
/\\ / ___'_ __ _ _(_)_ __ __ _ \ \ \ \
( ( )\___ | '_ | '_| | '_ \/ _` | \ \ \ \
\\/ ___)| |_)| | | | | || (_| | ) ) ) )
' |____| .__|_| |_|_| |_\__, | / / / /
=========|_|==============|___/=/_/_/_/

:: Spring Boot :: (v3.5.4)

2025-08-20T09:48:00.883+09:00 INFO 48585 --- [demo] [ main] com.example.demo.DemoApplication : Starting DemoApplication using Java 17.0.15 with PID 48585 (/Users/dowonjun/Desktop/VSC/study/research/spring_demo/target/classes started by dowonjun in /Users/dowonjun/Desktop/VSC/study/research/spring_demo)
2025-08-20T09:48:00.884+09:00 INFO 48585 --- [demo] [ main] com.example.demo.DemoApplication : No active profile set, falling back to 1 default profile: "default"
2025-08-20T09:48:01.109+09:00 INFO 48585 --- [demo] [ main] o.s.b.w.embedded.tomcat.TomcatWebServer : Tomcat initialized with port 9898 (http)
2025-08-20T09:48:01.116+09:00 INFO 48585 --- [demo] [ main] o.apache.catalina.core.StandardService : Starting service [Tomcat]
2025-08-20T09:48:01.117+09:00 INFO 48585 --- [demo] [ main] o.apache.catalina.core.StandardEngine : Starting Servlet engine: [Apache Tomcat/10.1.43]
2025-08-20T09:48:01.134+09:00 INFO 48585 --- [demo] [ main] o.a.c.c.C.[Tomcat].[localhost].[/] : Initializing Spring embedded WebApplicationContext
2025-08-20T09:48:01.134+09:00 INFO 48585 --- [demo] [ main] w.s.c.ServletWebServerApplicationContext : Root WebApplicationContext: initialization completed in 230 ms
2025-08-20T09:48:01.223+09:00 INFO 48585 --- [demo] [ main] o.s.b.w.embedded.tomcat.TomcatWebServer : Tomcat started on port 9898 (http) with context path '/'
2025-08-20T09:48:01.227+09:00 INFO 48585 --- [demo] [ main] com.example.demo.DemoApplication : Started DemoApplication in 0.46 seconds (process running for 0.55)
2025-08-20T09:48:04.207+09:00 INFO 48585 --- [demo] [nio-9898-exec-1] o.a.c.c.C.[Tomcat].[localhost].[/] : Initializing Spring DispatcherServlet 'dispatcherServlet'
2025-08-20T09:48:04.207+09:00 INFO 48585 --- [demo] [nio-9898-exec-1] o.s.web.servlet.DispatcherServlet : Initializing Servlet 'dispatcherServlet'
2025-08-20T09:48:04.208+09:00 INFO 48585 --- [demo] [nio-9898-exec-1] o.s.web.servlet.DispatcherServlet : Completed initialization in 1 ms
  • ./mvnw
    • 프로젝트에 지정된 Maven 버전을 자동 다운로드 및 실행함 → 팀원 간 Maven 버전 차를 방지
  • spring-boot-maven-pluginrun 을 실행
    • run 외에 repackage , stop 등 있으며(각각 다른 동작 로직을 내포) run 은 소스코드 컴파일 후 실행을 담당

Build Process

  1. 소스코드 컴파일 & 리소스 복사
  • compile phase를 수행 → target/classes 생성
  1. ClassPath 결합
  • target/classes + dependencies (Maven이 가져온 jar) → 실행용 classpath 구성
  1. 메인 클래스 탐색
  • @SpringBootApplication 이 붙은 클래스(DemoApplication)을 엔트리포인트로 지정
  • 또는 pom.xml에 start-class 지정 가능
  1. JVM 프로세스 실행
  • org.springframework.boot.devtools.restart.RestartLauncher 같은 부트 런처가 main() 실행
  • DevTools : 코드 변경 감지 시 자동 리스타트 지원
  1. SpringApplication.run() 호출
  • IoC 컨테이너 생성, Bean 스캔, 의존성 주입(DI), 내장 톰캣/Jetty/Undertow 구동 … 등

Spring 최적화

Spring은 위에서 설명한 Gradle, Maven과 같은 도구들을 활용하여 빌드 최적화를 개선시키려 노력 하고 있다. 예시로 Spring Boot3부터는 GraalVM Native Image를 지원한다. 일반적인 Spring 애플리케이션은 JAR / WAR형태로 패키징하고 실행 시 JVM 위에서 동작하지만 Native Image 방식은 GraalVM이 제공하는 AOT(Ahead Of Time) 컴파일러로 미리 기계어 바이너리를 만들어 놓는다. 즉 JVM을 사용할 필요 없이 바로 실행 가능한 실행파일을 얻을 수 있다. 이를 통해 수십 밀리초(JVM보다 약 50배 빠름) 내에 시작하는 작은 컨테이너의 형태로 Spring 애플리케이션을 배포할 수 있다.

GraalVM vs JVM

빌드 시간

  • 기존 JVM이 빌드되기까지는 몇 초면 가능
  • GraalVM Native Image 빌드는 미리 코드를 전부 기계어로 컴파일 하기 때문에 수 분이 걸림

메타데이터

  • JVM은 런타임에 리플렉션, 프록시, 동적 클래스 로딩 등을 자연스럽게 처리
  • GraalVM의 네이티브 이미지는 정적 컴파일이라 동적 기능을 사용하기 위해선 metadata가 필요
  • Spring이 많은 부분을 자동 추론해주지만, 외부 라이브러리는 직접 metadata를 지정해야 정상 작동함

Classpath 및 Bean 조건 고정

  • GraalVM의 네이티브 빌드 시점에 Classpath와 Bean조건이 고정
  • 런타임 중에 DB의 URL/비밀번호 등은 변경 가능하지만 DB유형을 변경하거나 Spring Bean의 구조를 변경하는 작업은 불가

Spring 구성 요소에 대한 이해

해당 챕터는 Spring에서 사용되는 함수, 구성요소의 코드레벨 동작과 동작을 분석하기 위한 디버깅 방식에 대한 내용을 포함한다. Spring의 코드레벨 단 동작을 분석하기 위해 빌드 과정 및 디버깅 방법에 대해 조사하였으며 그에 대한 내용을 서술하였다.

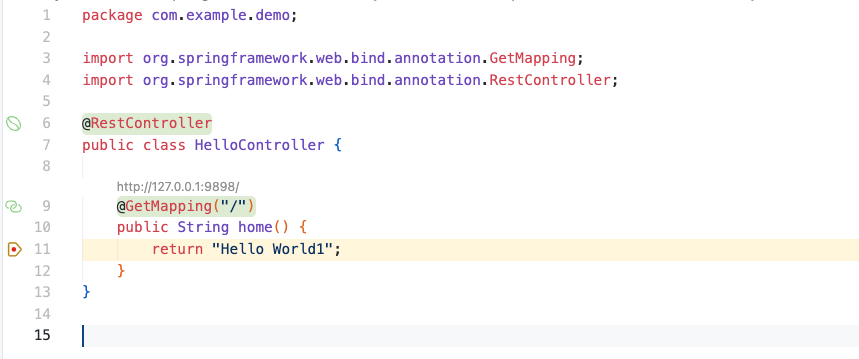
How to Debug Spring Application

Visual Studio Code를 기반으로 애플리케이션 디버깅 방식을 소개한다.

  1. VSCODE 확장팩 설치
  • Extension Pack for java
  • Spring Boot Extension Pack
  1. 구축한 어플리케이션의 start-class 파일로 가서 command + shift + D
  • click create a launch.json

Write as follows:

1
2
3
4
5
6
7
8
9
10
11
12
13
14
15
16
17
18
19
{
"version": "0.2.0",
"configurations": [
{
"type": "java",
"name": "Debug (Attach) - Spring Boot",
"request": "attach",
"hostName": "localhost",
"port": 5005
},
{
"type": "java",
"name": "Debug (Launch) - Spring Boot",
"request": "launch",
"mainClass": "com.example.demo.DemoApplication",
"projectName": "demo"
}
]
}
  1. 브레이크 포인트 설정

image.png

  1. Run and Debug 창에서 Debugging 방식 선택
  • Attach 방식 : Maven으로 실행한 어플리케이션에 직접 붙는 방식
    • 따로 포트를 지정해준 이유는 그 때문
  • Launch 방식 : VSC에서 직접 Spring App을 실행하고 디버깅하는 방식
  1. 앱에 접속 이후 call stack / Thread 확인

Thread

  • JVM 내부적으로 실행중인 스레드들
  • Reference Handler, Finalizer, Signal Dispatcher : 자바 런타임 내부 관리 스레드
  • Catalina-utility, http-nio-9898-exec-N : Tomcat에서 요청을 처리하는 워커 스레드
  • container-0 : Spring/Tomcat 관련 메인 서비스 스레드

Call Stack

  • 현재 breakpoint까지 호출된 메서드를 추적
  • 위 사진에선 아래 절차와 같이 호출 순서를 지님
    • ApplicationFilterChain.doFilterApplicationFilterChain.internalDoFilterHttpServlet.service → … → NativeMethodAccessorImpl.invoke0HelloController.home()

이와 같은 방식을 통해 쉽게 Spring 애플리케이션을 디버깅할 수 있으며 이외에도 JDB를 통해 CLI 환경에서 디버깅 환경을 구축하는 것도 가능하다. Rewrite의 리서처들은 위 방식을 통해 Spring 앱을 디버깅하고 각종 구성요소의 동작을 파악하였다.

Spring Annotation

Spring 어노테이션은 애플리케이션 개발 과정에서 반복적으로 작성하던 설정과 코드를 단순화하기 위해 제공되는 메타데이터 표기 방식이다. 클래스, 메서드, 필드 등에 붙여 특정 동작이나 설정을 선언적으로 지정할 수 있으며 대표적으로 @Component, @Service, @Repository, @Transactional 등이 존재한다. 이처럼 Spring 어노테이션은 XML 기반 설정을 대체하고, 코드 가독성과 유지보수성을 높이며, 개발자가 비즈니스 로직에 집중할 수 있도록 지원한다. 아래는 이러한 어노테이션의 종류이다.

스테레오타입 (빈 등록 관련)

  • @Component → 일반 Bean 등록
  • @Service → 서비스 계층 Bean 등록
  • @Repository → DAO/Repository 계층 Bean 등록 (예외 변환 기능 포함)
  • @Controller → MVC 컨트롤러 등록
  • @RestController → REST API 컨트롤러 (@Controller + @ResponseBody)
  • @Configuration → 설정용 Bean 등록

DI (의존성 주입)

  • @Autowired → 타입 기반 자동 주입
  • @Qualifier → Bean 이름으로 특정 Bean 주입
  • @Resource → JSR-250 기반 주입 (이름 기반 우선)
  • @Value → 프로퍼티 값 주입

Spring Boot 특화

  • @SpringBootApplication@Configuration + @EnableAutoConfiguration + @ComponentScan
  • @EnableAutoConfiguration → Boot의 자동 설정 활성화
  • @ComponentScan → 특정 패키지 하위에서 Bean 자동 스캔

웹 계층 (Spring MVC)

  • @RequestMapping → URL과 메서드 매핑
  • @GetMapping, @PostMapping, @PutMapping, @DeleteMapping → HTTP 메서드별 축약
  • @PathVariable → URL 경로 변수 바인딩
  • @RequestParam → 쿼리 파라미터 바인딩
  • @RequestBody → 요청 Body(JSON/XML 등)를 객체로 매핑
  • @ResponseBody → 반환 값을 HTTP Response Body로 직렬화
  • @CrossOrigin → CORS 설정

데이터 접근 / 트랜잭션

  • @Transactional → 선언적 트랜잭션 관리
  • @Entity → JPA 엔티티
  • @Table → 엔티티-테이블 매핑
  • @Id, @GeneratedValue → 엔티티 기본 키 지정
  • @Column → 엔티티 필드와 DB 컬럼 매핑
  • @RepositoryRestResource → Spring Data REST 리포지토리 노출

검증/바인딩 (Bean Validation, JSR-303/380)

  • @Valid, @Validated → 검증 활성화
  • @NotNull, @NotEmpty, @NotBlank → 필수 값 검증
  • @Size, @Min, @Max → 값의 크기 검증
  • @Pattern → 정규식 패턴 검증
  • @Email → 이메일 형식 검증

기타

  • @Bean@Configuration 클래스 안에서 Bean 정의
  • @ConditionalOnProperty, @ConditionalOnClass → 조건부 Bean 등록 (Boot에서 많이 사용)
  • @EnableScheduling / @Scheduled → 스케줄링 지원
  • @EnableAsync / @Async → 비동기 실행 지원
  • @Profile → 특정 환경(Profile)에서만 Bean 활성화

Annotation 분석

@Component

1
2
3
4
5
6
7
@Target({ElementType.TYPE})
@Retention(RetentionPolicy.RUNTIME)
@Documented
@Indexed
public @interface Component {
String value() default ""; // Bean 이름 지정 가능, ex) @Component("mybean")
}
  • 클래스 자체를 Bean으로 등록
  • 주로 일반 Service/DAO 클래스에 붙임

@Bean

1
2
3
4
5
6
7
8
9
10
11
12
13
14
15
16
17
18
19
20
21
22
23
24
25
26
27
28
@Target({ElementType.METHOD, ElementType.ANNOTATION_TYPE})
@Retention(RetentionPolicy.RUNTIME)
@Documented
public @interface Bean {
@AliasFor("name")
String[] value() default {};

@AliasFor("value")
String[] name() default {};

boolean autowireCandidate() default true;

boolean defaultCandidate() default true;

Bean.Bootstrap bootstrap() default Bean.Bootstrap.DEFAULT;

String initMethod() default "";

String destroyMethod() default "(inferred)";

public static enum Bootstrap {
DEFAULT,
BACKGROUND;

private Bootstrap() {
}
}
}
  • 메서드 반환 객체를 Bean으로 등록
  • 주로 라이브러리 객체, 외부 의존성, 직접 인스턴스화 해야 하는 Bean 등록 시 사용
  • @Configuration 클래스 안에서 선언

@Controller

1
2
3
4
5
6
7
8
9
10
@Target({ElementType.TYPE})
@Retention(RetentionPolicy.RUNTIME)
@Documented
@Component
public @interface Controller {
@AliasFor(
annotation = Component.class // Controller value속성이 Component value속성과 같다는 의미
)
String value() default "";
}
  • 컨트롤러 클래스임을 표시하는 어노테이션
  • Controller 어노테이션 내부는 Component어노테이션 부분과 동일함
    • 자동으로 Bean 등록

@RestController

1
2
3
4
5
6
7
8
9
10
11
@Target({ElementType.TYPE})
@Retention(RetentionPolicy.RUNTIME)
@Documented
@Controller
@ResponseBody
public @interface RestController {
@AliasFor(
annotation = Controller.class
)
String value() default "";
}
  • Controller 어노테이션에 ResponseBody어노테이션이 합쳐진 조합
  • 메서드의 반환 값이 즉시 HTTP Response Body로 직렬화됨

@Configuration

1
2
3
4
5
6
7
8
9
10
11
12
13
14
@Target({ElementType.TYPE})
@Retention(RetentionPolicy.RUNTIME)
@Documented
@Component
public @interface Configuration {
@AliasFor(
annotation = Component.class
)
String value() default "";

boolean proxyBeanMethods() default true; // @Bean 메서드 호출 시 싱글톤 보장 여부

boolean enforceUniqueMethods() default true; // 같은 이름의 @Bean 메서드 중복 방지
}
  • Spring의 설정 클래스임을 표시하는 어노테이션
  • 내부적으로 @Component가 포함되어 있음 ⇒ 자동으로 Bean으로 등록

@SpringBootApplication

1
2
3
4
5
6
7
8
9
10
11
12
13
14
15
16
17
18
19
20
21
22
23
24
25
26
27
28
29
30
31
32
33
34
35
36
37
38
39
40
41
42
43
44
45
46
47
48
49
@Target({ElementType.TYPE})
@Retention(RetentionPolicy.RUNTIME)
@Documented
@Inherited
@SpringBootConfiguration
@EnableAutoConfiguration
@ComponentScan(
excludeFilters = {@Filter(
type = FilterType.CUSTOM,
classes = {TypeExcludeFilter.class}
), @Filter(
type = FilterType.CUSTOM,
classes = {AutoConfigurationExcludeFilter.class}
)}
)
public @interface SpringBootApplication {
@AliasFor(
annotation = EnableAutoConfiguration.class
)
Class<?>[] exclude() default {};

@AliasFor(
annotation = EnableAutoConfiguration.class
)
String[] excludeName() default {};

@AliasFor(
annotation = ComponentScan.class,
attribute = "basePackages"
)
String[] scanBasePackages() default {};

@AliasFor(
annotation = ComponentScan.class,
attribute = "basePackageClasses"
)
Class<?>[] scanBasePackageClasses() default {};

@AliasFor(
annotation = ComponentScan.class,
attribute = "nameGenerator"
)
Class<? extends BeanNameGenerator> nameGenerator() default BeanNameGenerator.class;

@AliasFor(
annotation = Configuration.class
)
boolean proxyBeanMethods() default true;
}
  • SpringBoot Application의 진입점 어노테이션
  • 실제로는 여러 어노테이션을 합쳐놓은 메타 어노테이션
  • 해당 어노테이션이 존재할 시, Spring Boot는 자동 설정+컴포넌트 스캔+설정 클래스 등록을 전부 처리

@SpringBootConfiguration

1
2
3
4
5
6
7
8
9
10
11
12
@Target({ElementType.TYPE})
@Retention(RetentionPolicy.RUNTIME)
@Documented
@Configuration
@Indexed
public @interface SpringBootConfiguration {
@AliasFor(
annotation = Configuration.class
)
boolean proxyBeanMethods() default true;
}

  • Configuration어노테이션의 특수 버전
  • 설정 클래스 임을 알려줌

@EnableAutoConfiguration

1
2
3
4
5
6
7
8
9
10
11
12
13
@Target({ElementType.TYPE})
@Retention(RetentionPolicy.RUNTIME)
@Documented
@Inherited
@AutoConfigurationPackage
@Import({AutoConfigurationImportSelector.class})
public @interface EnableAutoConfiguration {
String ENABLED_OVERRIDE_PROPERTY = "spring.boot.enableautoconfiguration";

Class<?>[] exclude() default {};

String[] excludeName() default {};
}
  • Spring Boot의 핵심
  • classpath에 있는 라이브러리를 기반으로 적절한 Bean들을 자동적으로 등록 (사전에 정의한 라이브러리들이 특정 조건에 만족될 경우 Bean으로 등록)

@ComponentScan

1
2
3
4
5
6
7
8
9
10
11
12
13
14
15
16
17
18
19
20
21
22
23
24
25
26
27
28
29
30
31
32
33
34
35
36
37
38
39
40
41
42
43
@Retention(RetentionPolicy.RUNTIME)
@Target({ElementType.TYPE})
@Documented
@Repeatable(ComponentScans.class)
public @interface ComponentScan {
@AliasFor("basePackages")
String[] value() default {};

@AliasFor("value")
String[] basePackages() default {};

Class<?>[] basePackageClasses() default {};

Class<? extends BeanNameGenerator> nameGenerator() default BeanNameGenerator.class;

Class<? extends ScopeMetadataResolver> scopeResolver() default AnnotationScopeMetadataResolver.class;

ScopedProxyMode scopedProxy() default ScopedProxyMode.DEFAULT;

String resourcePattern() default "**/*.class";

boolean useDefaultFilters() default true;

ComponentScan.Filter[] includeFilters() default {};

ComponentScan.Filter[] excludeFilters() default {};

boolean lazyInit() default false;

@Retention(RetentionPolicy.RUNTIME)
@Target({})
public @interface Filter {
FilterType type() default FilterType.ANNOTATION;

@AliasFor("classes")
Class<?>[] value() default {};

@AliasFor("value")
Class<?>[] classes() default {};

String[] pattern() default {};
}
}
  • 현재 패키지를 기준으로 하위 패키지에서 @Component , @Service , @Controller , @Repository 등을 스캔해서 Bean으로 등록

Spring 데이터 전달 방식

보통 Repository 메서드는 Entity전체를 반환하는데 API에서 모든 속성이 필요하지 않은 경우가 많다.

엔티티에서 원하는 속성만 추출해서 DTO나 인터페이스 등으로 반환하는 방법이 필요할 때가 있는데 이때 사용하기 적절한 방식이 Projection방식이다.

Projection 방식에는 아래와 같은 종류가 있다.

  • Interface-based Projections
  • Nested Projections
  • Closed / Open Projections
  • Default Method 활용
  • Nullable Wrappers
  • DTO

DTO를 제외한 나머지는 인터페이스 기반 Projection 으로 아래 예시와 같다.

1
2
3
4
5
6
7
8
9
interface PersonSummary {
String getFirstname();
String getLastname();
AddressSummary getAddress();

interface AddressSummary {
String getCity();
}
}

인터페이스 기반 프로젝션은 런타임 프록시 객체를 만들어서 Entity를 Projection 으로 매핑한다.

인터페이스 기반 이외에도 DTO를 사용하여 클래스 기반 Projection 을 만들 수 있다.

DTO

  • DTO는 Data Transfer Object의 약자로 데이터를 전달하기 위한 객체
  • 프록시 객체가 아니라 생성자를 통해 직접 매핑
  • DTO는 getter/setter 메소드를 포함
  • 주로 frontend의 view와 backend의 controller 사이에서 사용

image.png

이때 record 를 사용하면 private final 필드와 equals , toString 등의 함수가 자동생성되므로 DTO생성이 매우 간단해진다.

1
2
record NamesOnly(String firstname, String lastname) {
}

일반 클래스라면 생성자에 @PersistenceCreator 를 붙여서 매핑 대상 생성자를 지정 가능하다.

1
2
3
4
5
6
7
8
9
10
11
public class NamesOnly {
private final String firstname;
private final String lastname;

@PersistenceCreator
public NamesOnly(String firstname, String lastname) {
this.firstname = firstname;
this.lastname = lastname;
}
}

  • DTO의 주요 목적은 한번의 호출로 여러 매개 변수를 일괄 처리해서 서버의 왕복을 줄이는 것
  • 주로 Entity를 Controller와 같은 클라이언트단에 직접 전달하는 대신 DTO를 사용해 데이터를 교환함

DAO

  • data access object의 약자로 database에 접근하는 역할을 하는 객체
  • 데이터 접근 로직을 애플리케이션의 나머지 부분(서비스, 비즈니스 로직)과 분리하기 위한 패턴
  • Spring에선 주로 @Repository 를 사용하여 표기함
1
2
public interface itemRepository extends JpaRepository<Item, Long> {
}

VO

  • value Object의 줄임말로 DTO는 getter와 setter 모두를 가지고 있는 반면, VO는 getter만을 가지기 떄문에 읽기만 가능하고 수정은 불가능함
  • 도메인 규칙을 담은 행위(메서드)를 포함할 수 있음
1
2
3
4
5
6
7
8
9
10
11
12
13
14
15
16
17
18
19
20
public final class Email {
private final String value;

public Email(String value) {
if (value == null || !value.matches("^[\\w.+-]+@[\\w.-]+\\.[A-Za-z]{2,}$"))
throw new IllegalArgumentException("Invalid email");
this.value = value;
}

public String value() { return value; }

// 값 동등성
@Override public boolean equals(Object o) {
if (this == o) return true;
if (!(o instanceof Email)) return false;
return value.equals(((Email) o).value);
}
@Override public int hashCode() { return value.hashCode(); }
@Override public String toString() { return value; }
}

final로 선언했기에 상속이 불가능하고 setter 가 없으며 VO에서 값 동등성은 속성값의 동일 여부로 판단한다. 즉, 같은 객체로 판단되려면 같은 속성값들을 가져야 한다.

Research for Spring CVE


CVE-2025-22223

https://spring.io/security/cve-2025-22223

Spring security에서 사용되는 Security Annotation의 잘못된 사용으로 인해 이를 우회할 수 있는 취약점이다.

@EnableMethodSecurity 를 사용하는 환경에서 보안 어노테이션(@PreAuthorize, @Secured 등)이 제네릭 기반 (superclass, interface) 선언부 또는 오버라이드 메서드에만 붙어있고 실제 타겟 메서드에서는 어노테이션이 없는 경우에 인증 우회가 가능하다.

즉 아래와 같은 환경에서 취약점이 발생할 수 있다.

  1. @EnableMethodSecurity 사용
  2. 보안 어노테이션을 오버라이드 메서드에서만 사용하고 대상 메서드에서는 사용하지 않음

시에 적절한 권한 없이 대상 메서드를 호출할 수 있다.

Affected

  • Spring Security 6.4.0 ~ 6.4.3
  • CVSS : 5.3

Part0. 환경 구성

디렉터리 구조

1
2
3
4
5
6
7
8
9
10
11
12
13
14
15
16
17
18
19
├── main
│   ├── java
│   │   └── com
│   │   └── example
│   │   └── demo
│   │   ├── DemoApplication.java
│   │   ├── SecurityConfig.java
│   │   ├── api
│   │   │   ├── AbstractSecureApi.java
│   │   │   └── ParamApi.java
│   │   ├── model
│   │   │   └── AccountSecret.java
│   │   ├── service
│   │   │   ├── AbstractImpl.java
│   │   │   └── ParamImpl.java
│   │   └── web
│   │   └── PocController.java
│   └── resources
│   └── application.properties

pom.xml

1
2
3
4
5
6
7
8
9
10
11
12
13
14
15
16
17
18
19
20
21
22
23
24
25
26
27
28
29
30
31
32
33
34
35
36
37
38
39
40
41
42
43
44
45
46
47
48
49
50
51
52
53
54
55
56
57
<project xmlns="http://maven.apache.org/POM/4.0.0"
xmlns:xsi="http://www.w3.org/2001/XMLSchema-instance"
xsi:schemaLocation="http://maven.apache.org/POM/4.0.0
http://maven.apache.org/xsd/maven-4.0.0.xsd">

<modelVersion>4.0.0</modelVersion>

<groupId>com.example</groupId>
<artifactId>spring-security-demo</artifactId>
<version>1.0.0</version>
<packaging>jar</packaging>

<properties>
<java.version>17</java.version>
<spring.security.version>6.4.0</spring.security.version>
</properties>

<dependencies>
<!-- Spring Security Core -->
<dependency>
<groupId>org.springframework.security</groupId>
<artifactId>spring-security-core</artifactId>
<version>${spring.security.version}</version>
</dependency>

<!-- Spring Security Web -->
<dependency>
<groupId>org.springframework.security</groupId>
<artifactId>spring-security-web</artifactId>
<version>${spring.security.version}</version>
</dependency>

<!-- Spring Security Config -->
<dependency>
<groupId>org.springframework.security</groupId>
<artifactId>spring-security-config</artifactId>
<version>${spring.security.version}</version>
</dependency>
</dependencies>

<build>
<plugins>
<!-- Maven Compiler Plugin -->
<plugin>
<groupId>org.apache.maven.plugins</groupId>
<artifactId>maven-compiler-plugin</artifactId>
<version>3.10.1</version>
<configuration>
<source>${java.version}</source>
<target>${java.version}</target>
</configuration>
</plugin>
</plugins>
</build>

</project>

SecurityConfig.java

1
2
3
4
5
6
7
8
9
10
11
12
13
14
15
16
17
18
19
20
21
22
@Configuration
@EnableMethodSecurity(prePostEnabled = true, securedEnabled = true, proxyTargetClass = true)
public class SecurityConfig {

@Bean
SecurityFilterChain filterChain(HttpSecurity http) throws Exception {
http.authorizeHttpRequests(a -> a.anyRequest().authenticated())
.formLogin(f -> f.defaultSuccessUrl("/", true));
return http.build();
}

@Bean
UserDetailsService uds(PasswordEncoder enc) {
UserDetails user = User.withUsername("user").password(enc.encode("userpass")).roles("USER").build();
UserDetails admin = User.withUsername("admin").password(enc.encode("adminpass")).roles("ADMIN").build();
return new InMemoryUserDetailsManager(user, admin);
}

@Bean
PasswordEncoder passwordEncoder() { return new BCryptPasswordEncoder(); }
}

api/AbstractSecureApi.java

1
2
3
4
5
6
7
8
package com.example.demo.api;

import org.springframework.security.access.prepost.PreAuthorize;

public abstract class AbstractSecureApi<T> {
@PreAuthorize("hasRole('ADMIN')")
public abstract T mutate(T in);
}

api/ParamApi.java

1
2
3
4
5
6
7
8
package com.example.demo.api;

import org.springframework.security.access.prepost.PreAuthorize;

public interface ParamApi<T> {
@PreAuthorize("hasRole('ADMIN')")
<S extends T> T save(S in);
}

두 코드 모두 @PreAuthorize 어노테이션을 사용하고 있고 ADMIN 역할인지 검사하고 있다.

AbstractSecureApi.java 코드는 추상 클래스 버전이고 ParamApi.java 코드는 인터페이스 버전이다.

일반적인 경우 @PreAuthorize 어노테이션을 우회하지 못하지만 아래 service 코드들과 같이 다른 클래스에서 해당 클래스를 오버라이드 하고 있을 경우 우회가 가능하다.

AbstractImpl.java

1
2
3
4
5
6
7
8
9
10
11
12
13
package com.example.demo.service;

import com.example.demo.api.AbstractSecureApi;
import com.example.demo.model.AccountSecret;
import org.springframework.stereotype.Service;

@Service
public class AbstractImpl extends AbstractSecureApi<AccountSecret> {
@Override
public AccountSecret mutate(AccountSecret in) {
return new AccountSecret(in.value() + "-B");
}
}

ParamImpl.java

1
2
3
4
5
6
7
8
9
10
11
12
13
14
package com.example.demo.service;

import com.example.demo.api.ParamApi;
import com.example.demo.model.AccountSecret;
import org.springframework.stereotype.Service;

// 실제 타깃 빈의 "구현 메서드"에는 보안 어노테이션이 없음
@Service
public class ParamImpl implements ParamApi<AccountSecret> {
@Override
public AccountSecret save(AccountSecret in) {
return new AccountSecret(in.value() + "-A");
}
}

Part1. Root Cause

@EnableMethodSecurity 가 활성화된 환경에서 호출되는 타깃 메소드에 대해 보안 어노테이션을 찾기 위해 UniqueSecurityAnnotationScanner 가 계층을 타고 올라가며 스캔한다.

1
2
3
4
5
final class UniqueSecurityAnnotationScanner<A extends Annotation> extends AbstractSecurityAnnotationScanner<A> {
....
.... 생략
try {
Method methodToUse = targetClass.getDeclaredMethod(method.getName(), method.getParameterTypes());

이때, 스캐너가 자식 클래스의 실제 오버라이드 메소드를 찾기 위해 targetClass.getDeclaredMethod(method.getName(), method.getParameterTypes()) 같은 소거 기반 시그니처 매칭을 사용한다. 이러한 소거 기반 시그니처 매칭을 사용하면 AbstractImpl 의 실제 구현된 mutate 경우엔 AccountSecret mutate(AccountSecret) 으로 보지만 오버라이드 된 AbstractSecureApi 의 브리지 메서드 mutateObject mutate(Object) 와 같은 형태로 보기 때문에 서로 어노테이션이 없는것으로 보게 된다. 따라서 상위 선언부에 붙은 어노테이션을 놓치게 된다.
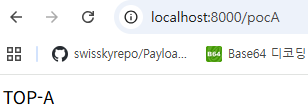
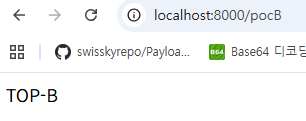
Part2. PoC

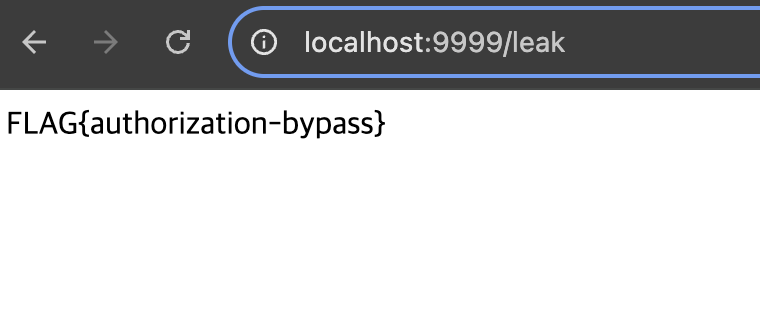
위 취약점 때문에 아래 Controller에서 user의 권한으로도 /pocA/pocB 에 접근이 가능하다.

1
2
3
4
5
6
7
8
9
10
11
12
13
14
15
16
17
18
19
20
21
22
23
@RestController
public class PocController {
private final ParamImpl paramImpl;
private final AbstractImpl abstractImpl;

public PocController(ParamImpl paramImpl, AbstractImpl abstractImpl) {
this.paramImpl = paramImpl;
this.abstractImpl = abstractImpl;
}

@GetMapping("/")
public String home() { return "home"; }

@GetMapping("/pocA")
public String pocA() {
return paramImpl.save(new AccountSecret("TOP")).value();
}

@GetMapping("/pocB")
public String pocB() {
return abstractImpl.mutate(new AccountSecret("TOP")).value();
}
}
  1. userID로 로그인

image.png

  1. /pocA , /pocB 접근 (Spring Security 6.4.0 버전) - 취약점 확인

image.png

image.png

  1. /pocA , /pocB 접근 (Spring Security 6.4.4 버전) - 패치 확인

image.png

image.png

Part3. Remediating and Defending

https://github.com/spring-projects/spring-security/commit/dc2e1af2dab8ef81cd4edd25b56a2babeaab8cf9

6.4.4버전 이후로는 기존 소거 기반 시그니처를 사용하는 대신 오버라이드 된 곳에서의 보안 어노테이션도 따라갈 수 있게 findMethod 를 사용하였다.

1
2
3
4
-		try {
- Method methodToUse = targetClass.getDeclaredMethod(method.getName(), method.getParameterTypes());
+ Method methodToUse = findMethod(method, targetClass);
+ if (methodToUse != null) {

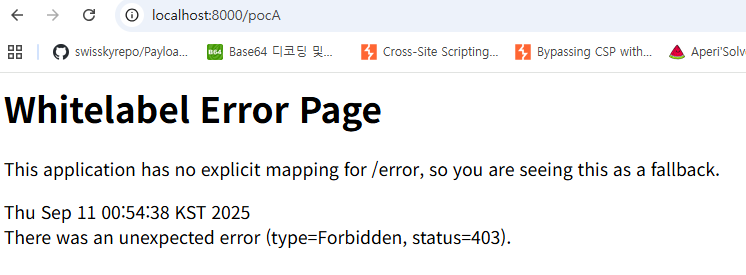
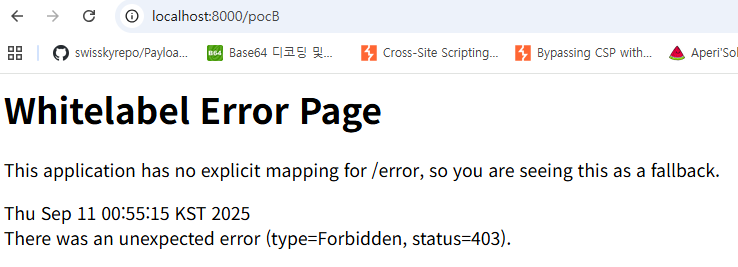
가장 구체적인 실제 호출 대상을 얻기 위해 브리지 / 공변 / 프록시까지 해석한 다음, 어노테이션은 다음 우선순위로 병합 탐색을 진행한다.

  1. 실제 호출될 구체 메서드
  2. 필요한 경우 선언 클래스/인터페이스 수준
    1. 그 메서드가 브리지인 경우 브리지 원본 메서드
    2. 파라미터화된 상위 타입/인터페이스의 대응 메서드

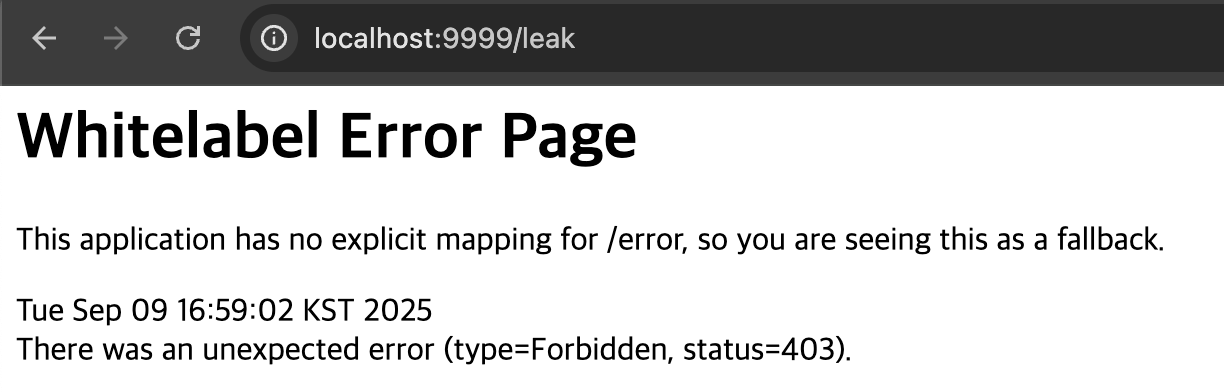
이렇게 하면 제네릭 치환된 상위 선언부에 붙은 보안 어노테이션도 타깃 메서드에 귀속된 것으로 평가되므로 우회가 불가능해진다.

CVE-2025-41232

CVE-2025-41232 는 특정 spring-security-core 버전에서 Spring 보안 어노테이션이 적용된 메서드를 탐지하는 로직이 잘못 구성되어 보안 요소가 우회될 수 있는 취약점이다. 특이하게도 해당 취약점은 위에서 소개된 CVE-2025-22223 취약점을 패치하기 위해 제작된 코드에서 발생하였으며 취약점 발생을 위한 구성 조건이 복잡하지 않아 많은 Spring 애플리케이션이 해당 취약점의 영향을 받았다. 아래는 해당 취약점에 대한 분석 내용이다.

Affected

  • spring security 6.4.0 - 6.4.5
    • @EnableMethodSecurity(mode=ASPECTJ) 사용
    • spring-security-aspects 사용
    • private/protected Method에 보안 어노테이션 사용 ex) @PreAuthorize

Part0. 환경 구성

디렉터리 구조

1
2
3
4
5
6
7
8
9
10
11
12
13
14
15
16
17
18
19
20
21
22
23
24
25
26
27
28
29
30
31
32
.
├── aspectj-poc.zip
├── build.gradle
├── gradle
│ └── wrapper
│ ├── gradle-wrapper.jar
│ └── gradle-wrapper.properties
├── gradlew
├── gradlew.bat
├── pom.xml
├── settings.gradle
├── src
│ ├── main
│ │ ├── java
│ │ │ └── com
│ │ │ └── example
│ │ │ └── demo
│ │ │ ├── AspectjPocApplication.java
│ │ │ ├── LeakController.java
│ │ │ ├── SecretService.java
│ │ │ └── SecurityConfig.java
│ │ └── resources
│ │ ├── application.properties
│ │ ├── static
│ │ └── templates
│ └── test
│ └── java
│ └── com
│ └── example
│ └── demo
│ └── AspectjPocApplicationTests.java

pom.xml

1
2
3
4
5
6
7
8
9
10
11
12
13
14
15
16
17
18
19
20
21
22
23
24
25
26
27
28
29
30
31
32
33
34
35
36
37
38
39
40
41
42
43
44
45
46
47
48
49
50
51
52
53
54
55
56
57
58
59
60
61
62
63
64
65
66
67
68
69
70
71
72
73
<project xmlns="http://maven.apache.org/POM/4.0.0"
xmlns:xsi="http://www.w3.org/2001/XMLSchema-instance"
xsi:schemaLocation="http://maven.apache.org/POM/4.0.0 https://maven.apache.org/xsd/maven-4.0.0.xsd">
<modelVersion>4.0.0</modelVersion>
<parent>
<groupId>org.springframework.boot</groupId>
<artifactId>spring-boot-starter-parent</artifactId>
<version>3.3.5</version>
<relativePath/>
</parent>

<groupId>poc.cve41232</groupId>
<artifactId>aspectj-poc</artifactId>
<version>0.0.1-SNAPSHOT</version>
<name>aspectj-poc</name>
<description>PoC for CVE-2025-41232 (AspectJ + spring-security-aspects)</description>

<properties>
<java.version>17</java.version>
<spring-security.version>6.4.5</spring-security.version>
</properties>

<dependencyManagement>
<dependencies>
<dependency>
<groupId>org.springframework.security</groupId>
<artifactId>spring-security-bom</artifactId>
<version>${spring-security.version}</version>
<type>pom</type>
<scope>import</scope>
</dependency>
</dependencies>
</dependencyManagement>

<dependencies>
<dependency>
<groupId>org.springframework.boot</groupId>
<artifactId>spring-boot-starter-web</artifactId>
</dependency>

<dependency>
<groupId>org.springframework.boot</groupId>
<artifactId>spring-boot-starter-security</artifactId>
</dependency>

<dependency>
<groupId>org.springframework.security</groupId>
<artifactId>spring-security-aspects</artifactId>
</dependency>

<dependency>
<groupId>org.aspectj</groupId>
<artifactId>aspectjweaver</artifactId>
<version>1.9.22.1</version>
<scope>runtime</scope>
</dependency>

<dependency>
<groupId>org.springframework.boot</groupId>
<artifactId>spring-boot-starter-test</artifactId>
<scope>test</scope>
</dependency>
</dependencies>

<build>
<plugins>
<plugin>
<groupId>org.springframework.boot</groupId>
<artifactId>spring-boot-maven-plugin</artifactId>
</plugin>
</plugins>
</build>
</project>

AspectjPocApplication.java

1
2
3
4
5
6
7
8
9
10
11
12
13
package com.example.demo;

import org.springframework.boot.SpringApplication;
import org.springframework.boot.autoconfigure.SpringBootApplication;

@SpringBootApplication
public class AspectjPocApplication {

public static void main(String[] args) {
SpringApplication.run(AspectjPocApplication.class, args);
}

}

LeakController.java

1
2
3
4
5
6
7
8
9
10
11
12
13
14
15
16
package com.example.demo;

import org.springframework.web.bind.annotation.GetMapping;
import org.springframework.web.bind.annotation.RestController;

@RestController
public class LeakController {
private final SecretService svc;
public LeakController(SecretService svc) { this.svc = svc; }

@GetMapping("/leak")
public String leak() {
return svc.invokeSecret();
}

}

SecretService.java

1
2
3
4
5
6
7
8
9
10
11
12
13
14
15
16
17
18
19
20
package com.example.demo;

import org.springframework.security.access.prepost.PreAuthorize;
import org.springframework.stereotype.Service;
import org.springframework.security.core.context.SecurityContextHolder;
import org.springframework.security.core.Authentication;
import org.springframework.security.authentication.UsernamePasswordAuthenticationToken;
import org.springframework.security.core.authority.SimpleGrantedAuthority;
import java.util.List;

@Service
public class SecretService {
@PreAuthorize("hasRole('X')")
private String privateMethod() {
return "FLAG{authorization-bypass}";
}
public String invokeSecret() {
return privateMethod();
}
}

SecurityConfig.java

1
2
3
4
5
6
7
8
9
10
11
12
13
14
15
16
17
18
19
20
package com.example.demo;

import org.springframework.context.annotation.AdviceMode;
import org.springframework.context.annotation.Configuration;
import org.springframework.context.annotation.EnableLoadTimeWeaving;
import org.springframework.context.annotation.Bean;
import org.springframework.security.config.annotation.method.configuration.EnableMethodSecurity;
import org.springframework.security.config.annotation.web.builders.HttpSecurity;
import org.springframework.security.web.SecurityFilterChain;

@Configuration
@EnableMethodSecurity(prePostEnabled = true, mode = AdviceMode.ASPECTJ)
public class SecurityConfig {
@Bean
SecurityFilterChain api(HttpSecurity http) throws Exception {
http.csrf(csrf -> csrf.disable());
http.authorizeHttpRequests(reg -> reg.anyRequest().permitAll());
return http.build();
}
}

Part1. Spring의 보안 어노테이션과 탐지 방식

Spring에서 메서드를 보호하기 위한 2가지 방식이 존재한다. 하나는 메서드 실행 전 호출 흐름을 가로채 권한을 검증하는 방식인 Based Proxy 방식이 있으며, 다른 방식은 AspectJ를 이용해 바이트코드 위빙으로 보안 로직을 직접적으로 삽입하는 Based AspectJ 방식이 존재한다.

Based Proxy

  • Spring AOP(프록시 기반)로 메서드 호출을 가로채서 권한 검증을 수행
    • Only Public Method
    • final, private, static 메서드는 적용 불가
    • 일반적으로 가장 많이 사용

Based AspectJ

  • AspectJ를 이용해 바이트코드 위빙으로 권한 검증 로직을 삽입
    • 자바 소스를 컴파일하면 .class 가 생김
    • JVM이 .class 파일을 메모리에 올릴 때 권한 검증 로직이 삽입됨
    • Original 소스를 바꾸지 않고도 실행 시점에 새로운 동작(로그, 권한검사, 트랜잭션 관리 등)을 추가 가능
    • ex)
      • Original
      1
      2
      3
      4
      5
      class SecretService {
      String getSecret() {
      return "FLAG{secret}";
      }
      }
      • After AspectJ Weaving
      1
      2
      3
      4
      5
      6
      7
      8
      class SecretService {
      String getSecret() {
      if (!SecurityContext.hasRole("ADMIN")) {
      throw new AccessDeniedException();
      }
      return "FLAG{secret}";
      }
      }
  • private, final, static 같은 메서드에도 어노테이션 적용 가능
  • 프록시 방식보다 강력하지만, 설정이 복잡하고 aspectjweaver javaagent 필요
    Weaving Types
    • Compile Type Weaving (CTW)
      • javac.class 만들 때 코드를 삽입
        Post Compile Weaving (Binary Weaving)
    • 이미 컴파일된 .class 또는 .jar에 다시 위빙해서 새로운 .class 생성
      Load-time Weaving (LTW)
    • JVM이 클래스를 로드하는 순간 javaagent가 개입해서 바이트코드를 수정
    • Spring Security에서 AspectJ 모드를 쓸 때 필요한 방식

CVE-2025-41232 는 Based AspectJ 방식에서 발견되었다. AspectJ 방식에서 호출되는 함수 내에 잘못 설계된 메서드 탐지 로직이 포함되었기 때문이다. 이를 이해하기 위해선 보안 어노테이션이 적용된 메서드를 탐색하는 과정에 대한 이해가 필요하다. 일반적으로 @PreAuthorize("hasRole('X')") 같은 메서드 보안 어노테이션은 리플렉션(reflection) 으로 읽어서 동작하도록 설계 되어있다.

  • 리플렉션
    • JVM 실행 중에 클래스 / 메서드 / 필드 같은 프로그램 구조를 조사하고, 심지어 호출·수정까지 할 수 있게 해주는 기능
    • → 코드를 하드코딩하지 않고, 실행 중에 동적으로 프로그램의 구조를 들여다보고 제어하는 기능

그러나 이러한 리플렉션은 호출 비용이 크고, 상속 / 인터페이스 / 브리지 메서드까지 탐색하는 경우 특히 느리다는 특징을 지니고 있다. 실제 서비스에서 컨트롤러 ↔ 서비스는 수천만번도 호출될 수 있는데 이를 수행 할때마다 리플렉션으로 어노테이션을 읽으면 퍼포먼스 하락 이슈가 발생할 수 밖에 없다. 따라서 Spring에서 보안 어노테이션을 읽고 실행하는 동작은 첫 호출에만 리플렉션 스캔을 수행하고 이후 ConcurrentHashMap 캐시에서 O(1) 로 조회하도록 구현되었다.

1
2
3
4
5
6
7
8
9
10
11
12
13
14
15
16
// https://github.com/spring-projects/spring-security/blob/6fb0591109e3c6d9fef9ee2d1a4f215c738c22da/core/src/main/java/org/springframework/security/core/annotation/UniqueSecurityAnnotationScanner.java#L112
MergedAnnotation<A> merge(AnnotatedElement element, Class<?> targetClass) {
if (element instanceof Parameter parameter) {
return this.uniqueParameterAnnotationCache.computeIfAbsent(parameter, (p) -> {
List<MergedAnnotation<A>> annotations = findParameterAnnotations(p);
return requireUnique(p, annotations);
});
}
if (element instanceof Method method) {
return this.uniqueMethodAnnotationCache.computeIfAbsent(new MethodClassKey(method, targetClass), (k) -> {
List<MergedAnnotation<A>> annotations = findMethodAnnotations(method, targetClass);
return requireUnique(method, annotations);
});
}
throw new AnnotationConfigurationException("Unsupported element of type " + element.getClass());
}

이때 리플렉션 스캔 이후 캐시 데이터를 생성하는 함수가 바로 merge() 함수이다. 메서드 / 파라미터 보안 어노테이션을 스캔해서 캐시에 넣고 이후부턴 캐시에 있는 걸 조회해서 반환(cache key : new MethodClassKey(method, targetClass))하는 동작을 수행한다. 여기서 merge() 함수는 보안 어노테이션이 적용된 메서드를 스캔하기 위해 findMethodAnnotations(Method method, Class<?> targetClass) 함수를 호출한다(현재 요청 처리 과정에서 필요한 어노테이션만 스캔함).

1
2
3
4
5
6
7
8
9
10
11
12
13
14
15
16
17
18
19
20
// https://github.com/spring-projects/spring-security/blob/6fb0591109e3c6d9fef9ee2d1a4f215c738c22da/core/src/main/java/org/springframework/security/core/annotation/UniqueSecurityAnnotationScanner.java#L196
private List<MergedAnnotation<A>> findMethodAnnotations(Method method, Class<?> targetClass) {
Method specificMethod = ClassUtils.getMostSpecificMethod(method, targetClass);
List<MergedAnnotation<A>> annotations = findClosestMethodAnnotations(specificMethod,
specificMethod.getDeclaringClass(), new HashSet<>());
if (!annotations.isEmpty()) {
return annotations;
}
if (specificMethod != method) {
annotations = findClosestMethodAnnotations(method, method.getDeclaringClass(), new HashSet<>());
if (!annotations.isEmpty()) {
return annotations;
}
}
annotations = findClosestClassAnnotations(specificMethod.getDeclaringClass(), new HashSet<>());
if (!annotations.isEmpty()) {
return annotations;
}
return Collections.emptyList();
}

여기서 메서드를 탐색하는 이유는 어노테이션이 적용된 메서드가 인터페이스나 상위 클래스에 선언된 메서드일 수 있기 때문이다(동일한 메서드가 오버라이드 되는 환경일 수 있으므로). ClassUtils.getMostSpecificMethod(...)를 호출하여 어노테이션이 탐지된 클래스(targetClass)를 기준으로 실제 실행될 메서드를 가져오며, 이를 기반으로 findClosestMethodAnnotations() 함수를 호출한다.

  • 런타임에 호출되는게 targetClass 구현체의 메서드기 때문에 오버라이드 된 메서드 가져옴
  • 가져온 메서드 기반으로 findClosestMethodAnnotations() 호출
1
2
3
4
5
6
7
8
9
10
11
12
13
14
15
16
17
18
19
20
21
// https://github.com/spring-projects/spring-security/blob/6fb0591109e3c6d9fef9ee2d1a4f215c738c22da/core/src/main/java/org/springframework/security/core/annotation/UniqueSecurityAnnotationScanner.java#L222
private List<MergedAnnotation<A>> findClosestMethodAnnotations(Method method, Class<?> targetClass,
Set<Class<?>> classesToSkip) {
if (targetClass == null || classesToSkip.contains(targetClass) || targetClass == Object.class) {
return Collections.emptyList();
}
classesToSkip.add(targetClass);
Method methodToUse = findMethod(method, targetClass);
if (methodToUse != null) {
List<MergedAnnotation<A>> annotations = findDirectAnnotations(methodToUse);
if (!annotations.isEmpty()) {
return annotations;
}
}
List<MergedAnnotation<A>> annotations = new ArrayList<>(
findClosestMethodAnnotations(method, targetClass.getSuperclass(), classesToSkip));
for (Class<?> inter : targetClass.getInterfaces()) {
annotations.addAll(findClosestMethodAnnotations(method, inter, classesToSkip));
}
return annotations;
}

해당 함수는 구체 메서드를 기반으로 어노테이션을 탐색하는데, 그 이유는 어노테이션이 구현체 메서드가 아니라 인터페이스 선언부, 상위 클래스 등에도 있을 수 있기 때문이다. 우선 specificMethod 자체에서 보안 어노테이션을 탐색하며 이 과정에서 어노테이션이 발견되지 않을 경우 상위 클래스 / 인터페이스까지 재귀적으로 타고 올라가며 “가장 가까운 어노테이션”을 찾아낸다.

  • 해당 과정이 재귀적 호출로 이루어짐
  • 결과적으로 인터페이스 / 상위 클래스 어노테이션까지 모두 탐색되긴 하지만
    가장 먼저 탐색된 “가장 가까운 어노테이션”을 반환함

이때 아래 로직을 통해 이미 방문했던 클래스는 방문하지 않도록 한다.

1
2
3
if (targetClass == null || classesToSkip.contains(targetClass) || targetClass == Object.class) {
return Collections.emptyList();
}

이후 메서드 파라미터로 전달 받은 method 에 대응되는 실제 Method 객체를 찾기 위해 targetClassmethod 를 기반으로 findMethod(method, targetClass) 를 호출한다.

1
2
3
4
5
6
7
8
9
10
11
12
// https://github.com/spring-projects/spring-security/blob/6fb0591109e3c6d9fef9ee2d1a4f215c738c22da/core/src/main/java/org/springframework/security/core/annotation/UniqueSecurityAnnotationScanner.java#L268
private static Method findMethod(Method method, Class<?> targetClass) {
for (Method candidate : targetClass.getDeclaredMethods()) {
if (candidate == method) {
return candidate;
}
if (isOverride(method, candidate)) {
return candidate;
}
}
return null;
}

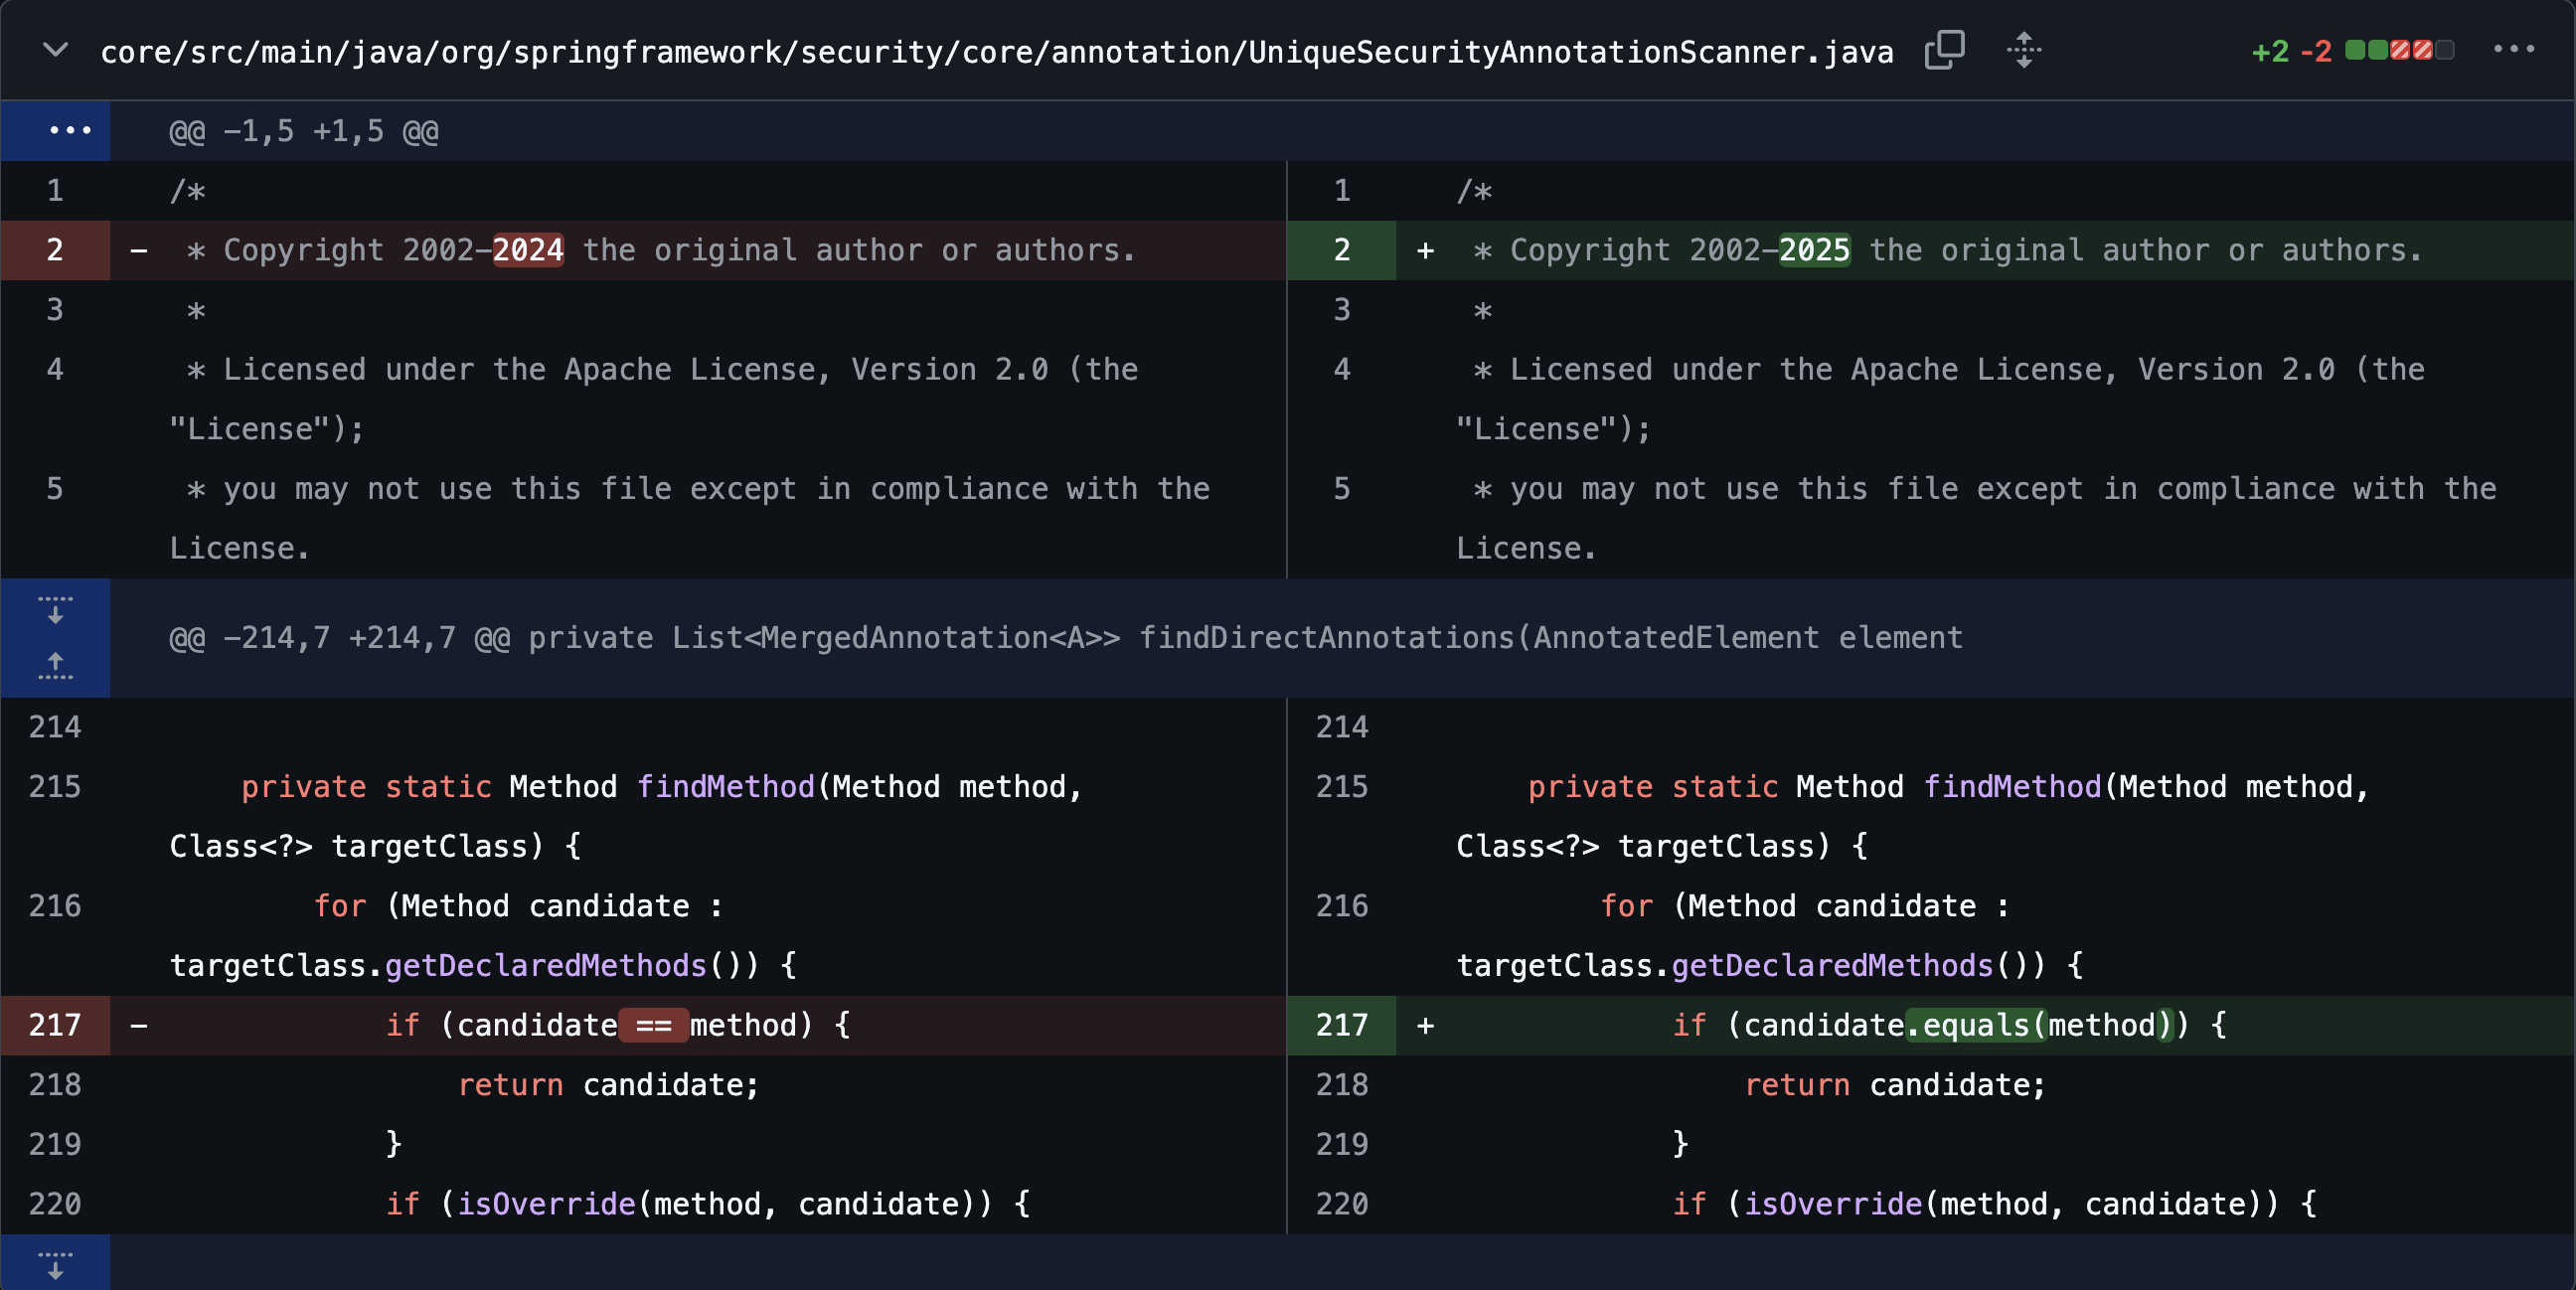
코드 로직을 살펴보면 getDeclaredMethods() 함수를 호출하여 targetClass에 선언된 모든 메서드 객체를 꺼내서 candidate 에 순회하면서 할당한다. 이후 candidate 와 메서드 파라미터로 전달된 method== 연산을 기반으로 “레퍼런스 동일성”을 비교하고 만약 동일하다면 동일하다고 판단된 candidate 객체를 반환하며 해당 검사 이후엔 isOverride(method, candidate 함수를 통해 오버라이드 관계성 비교를 수행하고 그 결과 여부에 따라 candidate or null 를 반환한다. 여기서 메서드 객체가 성공적으로 반환되면 해당 메서드를 기반으로 실제 리플렉션 호출 로직이 이뤄지고 결과적으로 캐시에 데이터가 추가된다.

Part2. Root Cause

환경 구성

루트커즈 분석을 위해 breakpoint를 spring-security-core 내부 코드에 걸어야 했다. 따라서 위에서 서술한 VSC 기반 GUI 디버거가 아닌 java 디버깅 포트를 열고 JDB를 attatch하여 분석하는 방식을 채택하였다.

  • 어플리케이션 실행
1
2
3
4
java -javaagent:"$WEAVER" \
-agentlib:jdwp=transport=dt_socket,server=y,suspend=n,address='*:5005' \
-Dorg.aspectj.weaver.showWeaveInfo=true -Daj.weaving.verbose=true \
-jar target/aspectj-poc-0.0.1-SNAPSHOT.jar
  • JDB attatch
1
2
3
4
5
6
# jdb -attach 5005
Set uncaught java.lang.Throwable
Set deferred uncaught java.lang.Throwable
Initializing jdb ...
> stop in org.springframework.security.core.annotation.UniqueSecurityAnnotationScanner.findMethod(java.lang.reflect.Method, java.lang.Class)
Set breakpoint org.springframework.security.core.annotation.UniqueSecurityAnnotationScanner.findMethod(java.lang.reflect.Method, java.lang.Class)

취약점 발생 코드

사실 Part1을 주의깊게 읽었다면 취약점이 어디서 발생했는지 알 수 있다. 취약점은 findMethod(method, targetClass) 함수에서 발생한다.

1
2
3
4
5
6
7
8
9
10
11
12
// https://github.com/spring-projects/spring-security/blob/6fb0591109e3c6d9fef9ee2d1a4f215c738c22da/core/src/main/java/org/springframework/security/core/annotation/UniqueSecurityAnnotationScanner.java#L268
private static Method findMethod(Method method, Class<?> targetClass) {
for (Method candidate : targetClass.getDeclaredMethods()) {
if (candidate == method) {
return candidate;
}
if (isOverride(method, candidate)) {
return candidate;
}
}
return null;
}

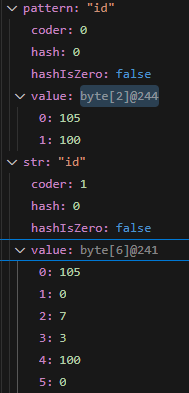
findMethod() 함수는 파라미터로 전달 받은 method 객체와 getDeclaredMethods() 함수로 꺼내온 객체를 == 연산으로 비교한다. 즉 레퍼런스 동일성 비교를 수행하는 셈인데, 동일 시그니처라도 Method 인스턴스가 다르기 때문에 레퍼런스 동일성 검사는 실패하게 된다. Method 는 리플렉션 핸들이라 생성 경로에 따라 서로 다른 인스턴스가 되며 이는 AspectJ 위빙/프록시/다른 코드 경로로 얻은 method 객체와 targetClass.getDeclaredMethods()가 만들어낸 method (candidate)는 다르다는 것를 의미한다. 따라서 해당 검증은 실패하게 된다. 이러한 사실은 jdb를 통해 확인할 수 있다.

1
2
3
4
5
6
7
8
9
10
11
12
13
14
15
http-nio-9999-exec-1[1] locals
Method arguments:
method = instance of java.lang.reflect.Method(id=7562)
targetClass = instance of java.lang.Class(reflected class=com.example.demo.SecretService, id=6238)
Local variables:
candidate = instance of java.lang.reflect.Method(id=7572)
http-nio-9999-exec-1[1] print candidate
candidate = "private java.lang.String com.example.demo.SecretService.privateMethod()"
http-nio-9999-exec-1[1] print method
method = "private java.lang.String com.example.demo.SecretService.privateMethod()"
http-nio-9999-exec-1[1] print method == candidate
method == candidate = false
http-nio-9999-exec-1[1] print method.equals(candidate)
method.equals(candidate) = true
http-nio-9999-exec-1[1]

같은 시그니처를 지닌 메서드이지만 레퍼런스 동일성 비교가 실패하는 것을 확인할 수 있다.

Part3. PoC/Exploit for CVE-2025-41232

Part0.에 명시된 대로 환경 구성을 끝마친 후, /leak 엔드포인트로 요청을 전송하여 응답 값을 확인하고 애플리케이션이 취약함을 확인할 수 있다. 또한 spring-security-core 버전에 따른 응답의 차이도 확인할 수 있다.

spring-security-core 6.4.5

image.png

spring-security-core 6.4.6

image.png

spring-security-core 6.4.6 버전에선 403이 응답된다.

Part4. Remediating and Defending

https://github.com/spring-projects/spring-security/issues/17143

image.png

메서드 서칭 방식을 변경하여 취약점을 방어하였다.

1
2
3
4
5
6
7
8
...
private static Method findMethod(Method method, Class<?> targetClass) {
for (Method candidate : targetClass.getDeclaredMethods()) {
- if (candidate == method) {
+ if (candidate.equals(method)) {
return candidate;
}
...

기존에 수행하던 == 비교 연산을 equals 로 변경하여 두 객체의 레퍼런스가 달라도 검증할 수 있도록 로직을 변경하였다.

==

  • 두 변수가 같은 객체를 참조하는 지 비교
  • 원시 타입은 값 자체를 비교
  • 객체 타입은 레퍼런스 주소를 비교

.equals()

  • 두 객체가 논리적으로 같은 값인지 비교
  • 클래스에 따라 오버라이드된 .equals() 로직을 따름
    • String.equals() → 문자열 내용 비교
    • Integer.equals() → 숫자 값 비교
    • Method.equals() → 메서드 시그니처 비교

CVE-2025-22233

https://spring.io/security/cve-2025-22233

CVE-2025-22233 은 Spring Framework의 DataBinderdisallowedFields 를 비교 및 차단하는 과정에서 대소문자 처리 불일치가 발생해 특정 상황에서 disallowedFields 우회 후 바인딩이 가능한 취약점이다.

Affected

  • Spring-Framework
    • 6.2.0 - 6.2.6
    • 6.1.0 - 6.1.19
    • 6.0.0 - 6.0.27
    • 5.3.0 - 5.3.42
  • setdisallowedFields 로 필드 바인딩 차단을 구성
  • disallowedFields 필드 이름이 i 로 시작

Part0. 환경 구성

디렉터리 구조

1
2
3
4
5
6
7
8
9
10
11
12
13
14
├─main
│ ├─java
│ │ └─com
│ │ └─example
│ │ └─cve202522233
│ │ Cve202522233Application.java
│ │ User.java
│ │ UserController.java
│ │
│ └─resources
│ │ application.properties
│ │
│ ├─static
│ └─templates

pom.xml

1
2
3
4
5
6
7
8
9
10
11
12
13
14
15
16
17
18
19
20
21
22
23
24
25
26
27
28
29
30
31
32
33
34
35
36
37
38
39
40
41
42
43
44
45
46
47
48
49
50
51
52
53
54
55
56
57
58
59
60
61
62
63
64
65
66
67
68
69
<?xml version="1.0" encoding="UTF-8"?>
<project xmlns="http://maven.apache.org/POM/4.0.0" xmlns:xsi="http://www.w3.org/2001/XMLSchema-instance"
xsi:schemaLocation="http://maven.apache.org/POM/4.0.0 https://maven.apache.org/xsd/maven-4.0.0.xsd">
<modelVersion>4.0.0</modelVersion>
<parent>
<groupId>org.springframework.boot</groupId>
<artifactId>spring-boot-starter-parent</artifactId>
<version>3.4.5</version>
<relativePath/>
</parent>
<dependencyManagement>
<dependencies>
<dependency>
<groupId>org.springframework</groupId>
<artifactId>spring-framework-bom</artifactId>
<version>6.2.6</version>
<type>pom</type>
<scope>import</scope>
</dependency>
</dependencies>
</dependencyManagement>
<groupId>com.example</groupId>
<artifactId>cve202522233</artifactId>
<version>0.0.1-SNAPSHOT</version>
<name>cve202522233</name>
<description>Demo project for Spring Boot</description>
<url/>
<licenses>
<license/>
</licenses>
<developers>
<developer/>
</developers>
<scm>
<connection/>
<developerConnection/>
<tag/>
<url/>
</scm>
<properties>
<java.version>17</java.version>
</properties>
<dependencies>
<dependency>
<groupId>org.springframework.boot</groupId>
<artifactId>spring-boot-starter-web</artifactId>
</dependency>
<dependency>
<groupId>org.springframework.boot</groupId>
<artifactId>spring-boot-starter-validation</artifactId>
</dependency>
<dependency>
<groupId>org.springframework.boot</groupId>
<artifactId>spring-boot-starter-test</artifactId>
<scope>test</scope>
</dependency>
</dependencies>

<build>
<plugins>
<plugin>
<groupId>org.springframework.boot</groupId>
<artifactId>spring-boot-maven-plugin</artifactId>
</plugin>
</plugins>
</build>

</project>

User.java

1
2
3
4
5
6
7
8
9
10
11
12
13
14
15
16
17
18
package com.example.cve202522233;

public class User {
private String id;
private String role;
private String description;

public String getId() { return id; }
public void setId(String id) { this.id = id; }

public String getRole() { return role; }
public void setRole(String role) { this.role = role; }

public String getDescription() { return description; }
public void setDescription(String description) { this.description = description; }

}

UserController.java

1
2
3
4
5
6
7
8
9
10
11
12
13
14
15
16
17
18
19
20
21
22
23
24
25
26
27
28
29
package com.example.cve202522233;

import java.util.List;
import java.util.concurrent.CopyOnWriteArrayList;
import org.springframework.stereotype.Controller;
import org.springframework.web.bind.annotation.*;
import org.springframework.web.bind.WebDataBinder;

@Controller
public class UserController {

private static final List<User> DATA = new CopyOnWriteArrayList<>();

@InitBinder
public void initBinder(WebDataBinder binder) {
binder.setDisallowedFields("id","role");
}

@GetMapping("/add")
@ResponseBody
public String add(@ModelAttribute User user) {
DATA.add(user);
return "added: id=" + user.getid()
+ ", role=" + user.getRole()
+ ", description=" + user.getDescription();
}

}

Spring MVC에서 사용자 입력을 받아 User 객체를 생성해 DATA 에 저장하고, 데이터 바인딩 시 roleid 필드는 제외 하도록 설정하였다.

Cve202522233Application.java

1
2
3
4
5
6
7
8
9
10
11
12
13
14
package com.example.cve202522233;

import org.springframework.boot.SpringApplication;
import org.springframework.boot.autoconfigure.SpringBootApplication;

@SpringBootApplication
public class Cve202522233Application {

public static void main(String[] args) {
SpringApplication.run(Cve202522233Application.class, args);
}

}

Part1. Root Cause

1
2
3
4
5
protected void doBind(MutablePropertyValues mpvs) {
checkAllowedFields(mpvs); //바인딩이 가능한 허용 필드인지 검증
checkRequiredFields(mpvs); //필수 필드가 모두 존재하는지 확인
applyPropertyValues(mpvs); //실제 객체에 바인딩
}

mpvs 에는 쿼리 스트링 및 기타 요청 파라미터에서 추출된 값들이 저장되어 있다.

setDisallowedFields 를 설정한 경우 checkAllowedFields 에서 검증을 수행하게 된다.

1
2
3
4
5
6
7
8
9
10
11
12
13
14
protected void checkAllowedFields(MutablePropertyValues mpvs) {
PropertyValue[] pvs = mpvs.getPropertyValues();
for (PropertyValue pv : pvs) {
String field = PropertyAccessorUtils.canonicalPropertyName(pv.getName());
if (!isAllowed(field)) {
mpvs.removePropertyValue(pv);
getBindingResult().recordSuppressedField(field);
if (logger.isDebugEnabled()) {
logger.debug("Field [" + field + "] has been removed from PropertyValues " +
"and will not be bound, because it has not been found in the list of allowed fields");
}
}
}
}

파라미터 값들을 배열로 가져와 순회하며 필드 이름을 정규화한 뒤 허용,금지 목록을 검증하여 특정 필드를 바인딩 대상에서 제외한다.

1
2
3
4
5
6
protected boolean isAllowed(String field) {
String[] allowed = getAllowedFields();
String[] disallowed = getDisallowedFields();
return ((ObjectUtils.isEmpty(allowed) || PatternMatchUtils.simpleMatch(allowed, field)) &&
(ObjectUtils.isEmpty(disallowed) || !PatternMatchUtils.simpleMatch(disallowed, field.toLowerCase(Locale.ROOT))));
}

허용 목록이 비어 있거나 field 가 허용 패턴과 일치하고 금지 목록이 비어 있거나 필드 이름을 소문자(로케일 무시)로 바꾼 뒤 금지 패턴과 일치하지 않을 때 true 를 반환한다.

이때 İ (\u0130 )로 시작하는 필드 이름이 들어오면 소문자로 변환 시 (\u0069 \u0307 )이 된다.

1
2
3
4
5
6
7
8
9
10
11
public static boolean simpleMatch(@Nullable String[] patterns, @Nullable String str) {
if (patterns != null) {
//patterns는 금지된 필드 이름
for (String pattern : patterns) {
if (simpleMatch(pattern, str)) {
return true;
}
}
}
return false;
}

금지된 필드 목록 중 하나라도 str 과 매칭되면 true 즉 바인딩 대상에서 제외된다.

1
2
3
4
5
6
7
8
9
10
11
12
13
14
15
16
17
18
19
20
21
22
23
24
25
26
27
28
29
30
31
32
33
34
35
36
37
public static boolean simpleMatch(@Nullable String pattern, @Nullable String str) {
if (pattern == null || str == null) {
return false;
}

int firstIndex = pattern.indexOf('*');
if (firstIndex == -1) {
return pattern.equals(str);
}

if (firstIndex == 0) {
if (pattern.length() == 1) {
return true;
}
int nextIndex = pattern.indexOf('*', 1);
if (nextIndex == -1) {
return str.endsWith(pattern.substring(1));
}
String part = pattern.substring(1, nextIndex);
if (part.isEmpty()) {
return simpleMatch(pattern.substring(nextIndex), str);
}
int partIndex = str.indexOf(part);
while (partIndex != -1) {
if (simpleMatch(pattern.substring(nextIndex), str.substring(partIndex + part.length()))) {
return true;
}
partIndex = str.indexOf(part, partIndex + 1);
}
return false;
}

return (str.length() >= firstIndex &&
pattern.startsWith(str.substring(0, firstIndex)) &&
simpleMatch(pattern.substring(firstIndex), str.substring(firstIndex)));
}

*이 없을 경우 pattern.equals(str) 를 통해 바로 검사를 진행한다.

value의 값이 다른 모습

value의 값이 다른 모습

이전 소문자 변환을 통해 (\u0069\u0307 )가 되었기 때문에 i로 시작하는 금지된 필드 이름을 우회할 수 있다

의 경우 변환 시 k 가 되기 때문에 우회할 수 없다

이후 실제 객체에 바인딩한다.

1
2
3
4
5
6
7
8
9
10
protected void applyPropertyValues(MutablePropertyValues mpvs) {
try {
getPropertyAccessor().setPropertyValues(mpvs, isIgnoreUnknownFields(), isIgnoreInvalidFields());
}
catch (PropertyBatchUpdateException ex) {
for (PropertyAccessException pae : ex.getPropertyAccessExceptions()) {
getBindingErrorProcessor().processPropertyAccessException(pae, getInternalBindingResult());
}
}
}
1
2
3
4
5
6
7
8
9
10
11
12
13
14
15
16
17
18
19
20
21
22
23
24
25
26
27
28
29
30
31
32
33
34
35
36
37
38
39
40
41
42
43
44
45
public void setPropertyValues(PropertyValues pvs, boolean ignoreUnknown, boolean ignoreInvalid)
throws BeansException {

List<PropertyAccessException> propertyAccessExceptions = null;
List<PropertyValue> propertyValues = (pvs instanceof MutablePropertyValues mpvs ?
mpvs.getPropertyValueList() : Arrays.asList(pvs.getPropertyValues()));

if (ignoreUnknown) {
this.suppressNotWritablePropertyException = true;
}
try {
for (PropertyValue pv : propertyValues) {

try {
setPropertyValue(pv);
}
catch (NotWritablePropertyException ex) {
if (!ignoreUnknown) {
throw ex;
}
}
catch (NullValueInNestedPathException ex) {
if (!ignoreInvalid) {
throw ex;
}
}
catch (PropertyAccessException ex) {
if (propertyAccessExceptions == null) {
propertyAccessExceptions = new ArrayList<>();
}
propertyAccessExceptions.add(ex);
}
}
}
finally {
if (ignoreUnknown) {
this.suppressNotWritablePropertyException = false;
}
}

if (propertyAccessExceptions != null) {
PropertyAccessException[] paeArray = propertyAccessExceptions.toArray(new PropertyAccessException[0]);
throw new PropertyBatchUpdateException(paeArray);
}
}

mpvs에 있는 값들 중 타깃 객체(예시: User 클래스의 필드)에 같은 이름이 있으면 그대로 넣고 없으면 건너뛴다.

1
2
3
4
5
6
7
8
9
10
11
12
13
14
15
16
17
18
19
20
21
22
public void setPropertyValue(PropertyValue pv) throws BeansException {
PropertyTokenHolder tokens = (PropertyTokenHolder) pv.resolvedTokens;
if (tokens == null) {
String propertyName = pv.getName();
AbstractNestablePropertyAccessor nestedPa;
try {
nestedPa = getPropertyAccessorForPropertyPath(propertyName); //중첩경로
}
catch (NotReadablePropertyException ex) {
throw new NotWritablePropertyException(getRootClass(), this.nestedPath + propertyName,
"Nested property in path '" + propertyName + "' does not exist", ex);
}
tokens = getPropertyNameTokens(getFinalPath(nestedPa, propertyName));
if (nestedPa == this) {
pv.getOriginalPropertyValue().resolvedTokens = tokens;
}
nestedPa.setPropertyValue(tokens, pv);
}
else {
setPropertyValue(tokens, pv);
}
}

중첩경로를 찾아 토큰화한 뒤 설정한다.

1
2
3
4
5
6
7
8
9
//nestedPa.setPropertyValue
protected void setPropertyValue(PropertyTokenHolder tokens, PropertyValue pv) throws BeansException {
if (tokens.keys != null) {
processKeyedProperty(tokens, pv);
}
else {
processLocalProperty(tokens, pv);
}
}

token.keys 가 없으면 일반 Bean 필드로 간주하여 이름을 기반으로 탐색한다.

1
2
3
4
5
6
7
8
9
10
11
12
13
14
15
16
private void processLocalProperty(PropertyTokenHolder tokens, PropertyValue pv) {
PropertyHandler ph = getLocalPropertyHandler(tokens.actualName);
if (ph == null || !ph.isWritable()) {
if (pv.isOptional()) {
if (logger.isDebugEnabled()) {
logger.debug("Ignoring optional value for property '" + tokens.actualName +
"' - property not found on bean class [" + getRootClass().getName() + "]");
}
return;
}
if (this.suppressNotWritablePropertyException) {
return;
}
throw createNotWritablePropertyException(tokens.canonicalName);
}
...
1
2
3
4
protected BeanPropertyHandler getLocalPropertyHandler(String propertyName) {
PropertyDescriptor pd = getCachedIntrospectionResults().getPropertyDescriptor(propertyName);
return (pd != null ? new BeanPropertyHandler((GenericTypeAwarePropertyDescriptor) pd) : null);
}

매칭에 실패하면 첫글자에 uncapitalize 또는 capitalize를 적용해 다시 매칭한다.

1
2
3
4
5
6
7
8
9
10
11
12
13
@Nullable
PropertyDescriptor getPropertyDescriptor(String name) {
PropertyDescriptor pd = this.propertyDescriptors.get(name);
if (pd == null && StringUtils.hasLength(name)) {
// Same lenient fallback checking as in Property...
pd = this.propertyDescriptors.get(StringUtils.uncapitalize(name));
if (pd == null) {
pd = this.propertyDescriptors.get(StringUtils.capitalize(name));
}
}
return pd;
}

StringUtils.uncapitalize 에 의해 첫글자가 정규화되며 İi 로 변환된다.

1
2
3
public static String uncapitalize(String str) {
return changeFirstCharacterCase(str, false);
}
1
2
3
4
5
6
7
8
9
10
11
12
13
14
15
16
17
18
19
20
21
22
private static String changeFirstCharacterCase(String str, boolean capitalize) {
if (!hasLength(str)) {
return str;
}

char baseChar = str.charAt(0);
char updatedChar;
if (capitalize) {
updatedChar = Character.toUpperCase(baseChar);
}
else {
updatedChar = Character.toLowerCase(baseChar);
}
if (baseChar == updatedChar) {
return str;
}

char[] chars = str.toCharArray();
chars[0] = updatedChar;
return new String(chars);
}

이 코드에서 앞글자를 소문자로 변환한 것을 char 타입으로 받아 \u0307 이 잘리게 된다.

이 때문에 금지된 필드가 i로 시작하는 경우에만 취약점이 발생한다.

Part2. PoC

i로 시작하는 금지 필드가 등록된 환경에서, 요청 파라미터 키의 첫 글자를 İ (\u0130)로 변경하여 전송하면 취약점을 확인할 수 있다.

6.2.6 정상 동작

image.png

6.2.6 비정상 동작

image.png

Part3. Remediating and Defending

https://github.com/spring-projects/spring-framework/compare/v6.2.6...v6.2.7#diff-c87bc1f9f200911cf1e7162e93f842fe6c2451b27f60ec5f00a22611d50199cb

https://github.com/spring-projects/spring-framework/compare/v6.2.6...v6.2.7#diff-1f22c41307a3ddcec8f1bc7a237d3b77ac7564883f4c663402993affac8a5756

1
2
3
4
5
6
7
8
9
		else {
String[] fieldPatterns = new String[disallowedFields.length];
for (int i = 0; i < fieldPatterns.length; i++) {
- String field = PropertyAccessorUtils.canonicalPropertyName(disallowedFields[i]);
- fieldPatterns[i] = field.toLowerCase(Locale.ROOT);
+ fieldPatterns[i] = PropertyAccessorUtils.canonicalPropertyName(disallowedFields[i]);
}
this.disallowedFields = fieldPatterns;
}
1
2
3
4
5
6
7
8
9
10
11
12
13
	protected boolean isAllowed(String field) {
String[] allowed = getAllowedFields();
String[] disallowed = getDisallowedFields();
- return ((ObjectUtils.isEmpty(allowed) || PatternMatchUtils.simpleMatch(allowed, field)) &&
- (ObjectUtils.isEmpty(disallowed) || !PatternMatchUtils.simpleMatch(disallowed, field.toLowerCase(Locale.ROOT))));
+ if (!ObjectUtils.isEmpty(allowed) && !PatternMatchUtils.simpleMatch(allowed, field)) {
+ return false;
+ }
+ if (!ObjectUtils.isEmpty(disallowed)) {
+ return !PatternMatchUtils.simpleMatchIgnoreCase(disallowed, field);
+ }
+ return true;
}

금지 필드와 요청 파라미터에 적용하던 사전 정규화를 제거하고 disallowedFields 검사 자체를 케이스 무시 방식으로 수정했다.

Conclusion


Spring 리서치를 통해 개념적으로 알고 있었던 보안 어노테이션, 모델 권한 검증 등 Spring 보안적 요소의 코드 레벨 단 동작을 이해하고 학습할 수 있었으며 일부에 불과하겠지만 Spring를 이루는 구성 요소와 특징, 각 계층에 대해서도 학습할 수 있었다. 또한 리서치를 진행하면서 단순히 프레임워크가 제공하는 보안 기능을 “있다/없다” 수준에서 이해하는 것이 아니라, 내부 동작 원리와 한계점을 파악하는 것이 얼마나 중요한지 체감할 수 있었다. 예를 들어, 어노테이션 기반 접근제어가 어떻게 메서드 단위로 스캔되고 병합되는지, 프록시와 AOP를 통해 호출 흐름이 어떻게 제어되는지를 코드 단에서 확인하면서 “보안 로직이 프레임워크 레벨에서 주입된다”는 말이 실제로 무엇을 의미하는지 명확히 알 수 있었다.

결과적으로 이번 리서치를 통해 단순히 Spring 보안 기능의 개념을 아는 수준을 넘어, “왜 해당 보안 요소가 필요하며, 어떻게 동작하고, 어떤 조건에서 무력화될 수 있는가”라는 본질적인 질문을 던지고 답을 찾는 과정이 중요하다는 것을 느꼈다. 향후 프레임워크 보안 요소를 학습할 때 단순 사용법에 머무르지 않고, 내부 구조와 실제 공격 시나리오를 염두에 둔 심화 학습을 지속적으로 진행할 필요성을 크게 느꼈다.

Copyright

© 2025 HSPACE (이 문서의 소재에 한하여), Author : Rewrite Lab (도원준, 김민찬, 김동한)