TL;DR
This part covers three techniques: Error Events, CSS Tricks, and Navigation.
First, Error Events are, as the name suggests, a technique that deliberately triggers various errors and observes whether each error occurs in order to leak data. This Error Events technique is often used in combination with other XS-Leak methods. In this post, we will also explore the defense mechanisms against Error Events in detail. Because the CSS Tricks and Navigations sections that follow will also make use of the Error Events technique, we recommend reading about this method first.
CSS Tricks refers to techniques that leverage CSS to perform XS-Leaks. While CSS Injection is a well-known client-side attack, CSS Tricks in the context of XS-Leak does not involve injecting CSS directly; instead, it observes changes in CSS to leak data. In this post, we will focus on vulnerabilities found in CTFd as examples.
Finally, Navigations are useful for determining which actions (navigations) have occurred across sites. In this post, we will focus on three types of navigations: downloads, redirections, and caching.
Each of these techniques is highly practical and could occur in real-world scenarios. Therefore, in this post we will explain each method in detail and analyze vulnerabilities that have actually been found in the Real-World.
Error Events
Onerror attributes
When a web page sends a request, the server receives and processes it. After processing, it returns a response status based on whether the request succeeded (e.g., 200 OK, 404 Not Found).
Additionally, if the response has an error status, the browser will fire an error event.
1 | addEventListener("error", (event) => {}); |
You can catch the onerror event using addEventListener or onerror.
The code below is an example of catching error events using the img tag.
1 | function getError(url) { |
Error events can be triggered by many HTML elements besides <img>. For example, you can use the onerror attribute on tags that load cross-origin resources—such as <script>, <img>, and <link>—to detect failures. Browser behavior may vary depending on factors like the presence of certain headers (e.g., X-Content-Type-Options: nosniff, Content-Type) or built-in security protections.
By leveraging these error events, you can similarly determine response status as you would with the “Checking Response Status with CSS Tricks” method introduced later.
Example of Error Events XS-Leak
A typical example is checking whether you are logged in.
1 | const url = "https://example.org/admin"; |
This code works by requesting the admin page: if it loads successfully, you know the target is logged in as an admin; if it throws an error, they’re not an admin.
Alternatively, imagine there’s a page at https://example.org/users/{username}
that only lets the user whose username matches access it. A request to /users/my_username by that user will return 200 OK, while anyone else will get a 404 Not Found. An attacker can exploit this by iterating over all possible usernames and looking for the one that doesn’t return an error—revealing the valid my_username.
Twitter API : Find Username
This error‐events XS-Leak vulnerability has also been reported on a Twitter API endpoint.
https://hackerone.com/reports/505424
Twitter provides an API endpoint that returns user-related information:
https://developer.twitter.com/api/users/{USER_ID}/client-applications.json
If you’re not logged in—or if you are logged in but the {USER_ID} does not match your own user ID—the endpoint responds with a 403 status code and an error message.
1 | {"error":{"message":"You are not logged in as a user that has access to this developer.twitter.com resource.","sent":"2019-03-06T01:20:56+00:00","transactionId":"00d08f800009d7be"}}. |
Therefore, by checking whether this API returns an error, you can determine the target’s user ID.
Below is a publicly released PoC.
1 | var id = "Your ID"; |
Defense Mechanism
The most common defense is to enforce consistent behavior. Even when an error occurs, you’d only display an error message in the UI while always returning a 200 OK status code—this prevents error‐event leaks.
Another simple mitigation is to set your session cookie’s SameSite attribute to Lax. With SameSite=Lax, cookies won’t be sent on subresource requests (e.g. <img>, <iframe>, or <script>), which blocks attacks that use those tags to probe login status. Note, however, that most modern browsers already default to SameSite=Lax.
You can also mitigate this via response headers.
The first is the Cross-Origin-Resource-Policy header.
If you set : Cross-Origin-Resource-Policy: same-origin
then whether the server returns 200 OK or 404 Not Found, any subresource request will always trigger the same onerror event. This prevents an attacker from distinguishing which status code actually occurred. More precisely, requests loaded via HTML tags like <script> or <img> implicitly use “no-cors” mode. That mode still issues the network request, but by enforcing Cross-Origin-Resource-Policy: same-origin, the response body of any cross-origin request is never exposed to the page—it’s immediately treated as an error. This is clearly effective against onerror-based XS-Leak techniques, although the downside is that you can no longer load the response body of any cross-origin resource.
1 | GET http://localhost:5555/200 net::ERR_BLOCKED_BY_RESPONSE.NotSameOrigin 200 (OK) |
The second method is a new mechanism called Fetch Metadata.
When a webpage issues a request, the browser automatically adds the following headers:
- Sec-Fetch-Site: the relationship between the requesting site and the target site
- Sec-Fetch-Mode: the request mode
- Sec-Fetch-Dest: the request’s destination
For example:
<script src="http://localhost:5555/200"></script>
When you make a request via a <script> tag like this, the browser automatically includes the following headers:
1 | Sec-Fetch-Site: cross-site |
Therefore, the server can use this header value to block normal requests.
1 | app.use((res, res, next) => { |
CSS Tricks
CSS Tricks via Response Status
When a webpage sends a request to the server, the server processes that request and determines the response status code.
You can view a variety of response headers at the link below.
https://developer.mozilla.org/en-US/docs/Web/HTTP/Reference/Status
Servers typically return 2xx status codes for successful responses and 4xx status codes for errors.
Chromium-based browsers only record 2xx responses in their history. Moreover, when a URL is recorded, it automatically acquires the CSS :visited pseudo-class.
When a user visits a URL that returns 200 OK, the browser marks that link with the CSS :visited pseudo-class—typically rendering it in purple. An attacker can exploit this behavior to infer whether the user’s requests succeeded by checking which links ar styled as :visited.
CTFd 1-day : Leaking Flags
CTFd is a well-known CTF platform where you can upload challenges yourself and manage them from an admin page. A vulnerability was discovered in CTFd versions earlier than 3.7.2 that allows flag exfiltration via an XS-Leak technique.
On CTFd’s admin interface, there is a “Submissions” page where you can review every user’s submitted flags. In particular, the “Correct Submissions” page lists only the valid flags—and it even lets you search by a partial flag to find matching entries.
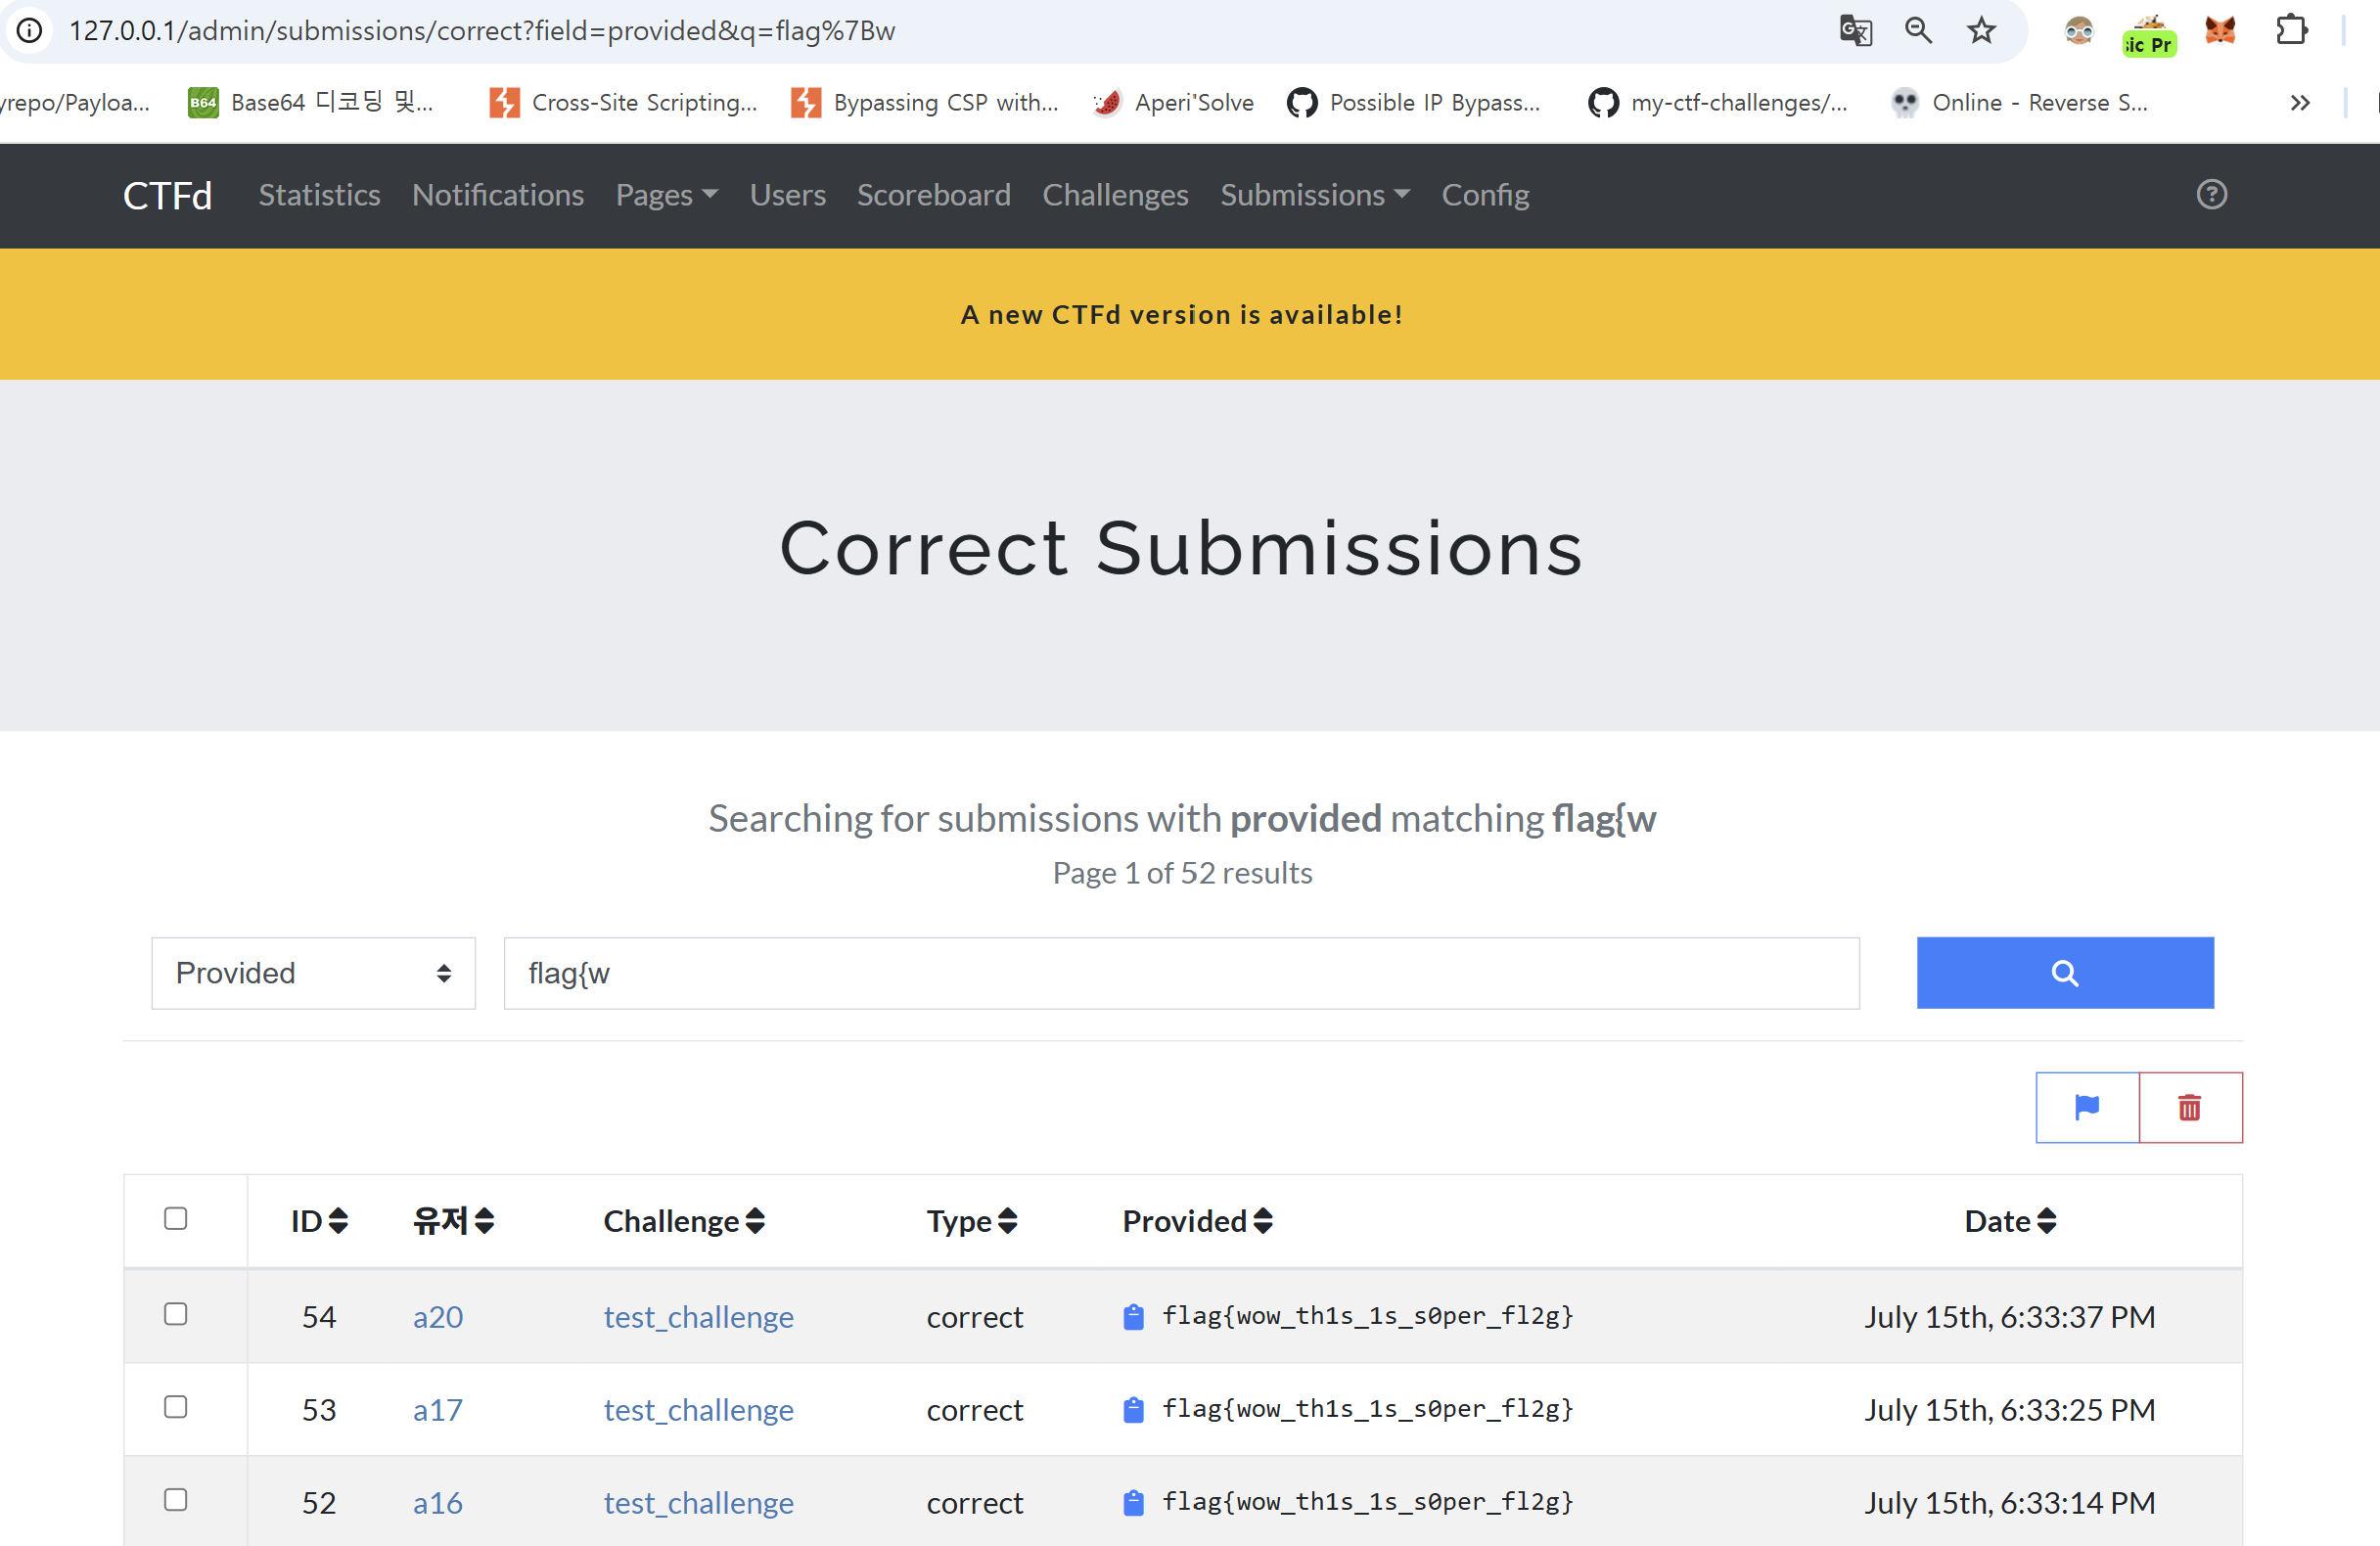
When you search for some flags on the Correct Submissions page, matching flags are displayed in a table.
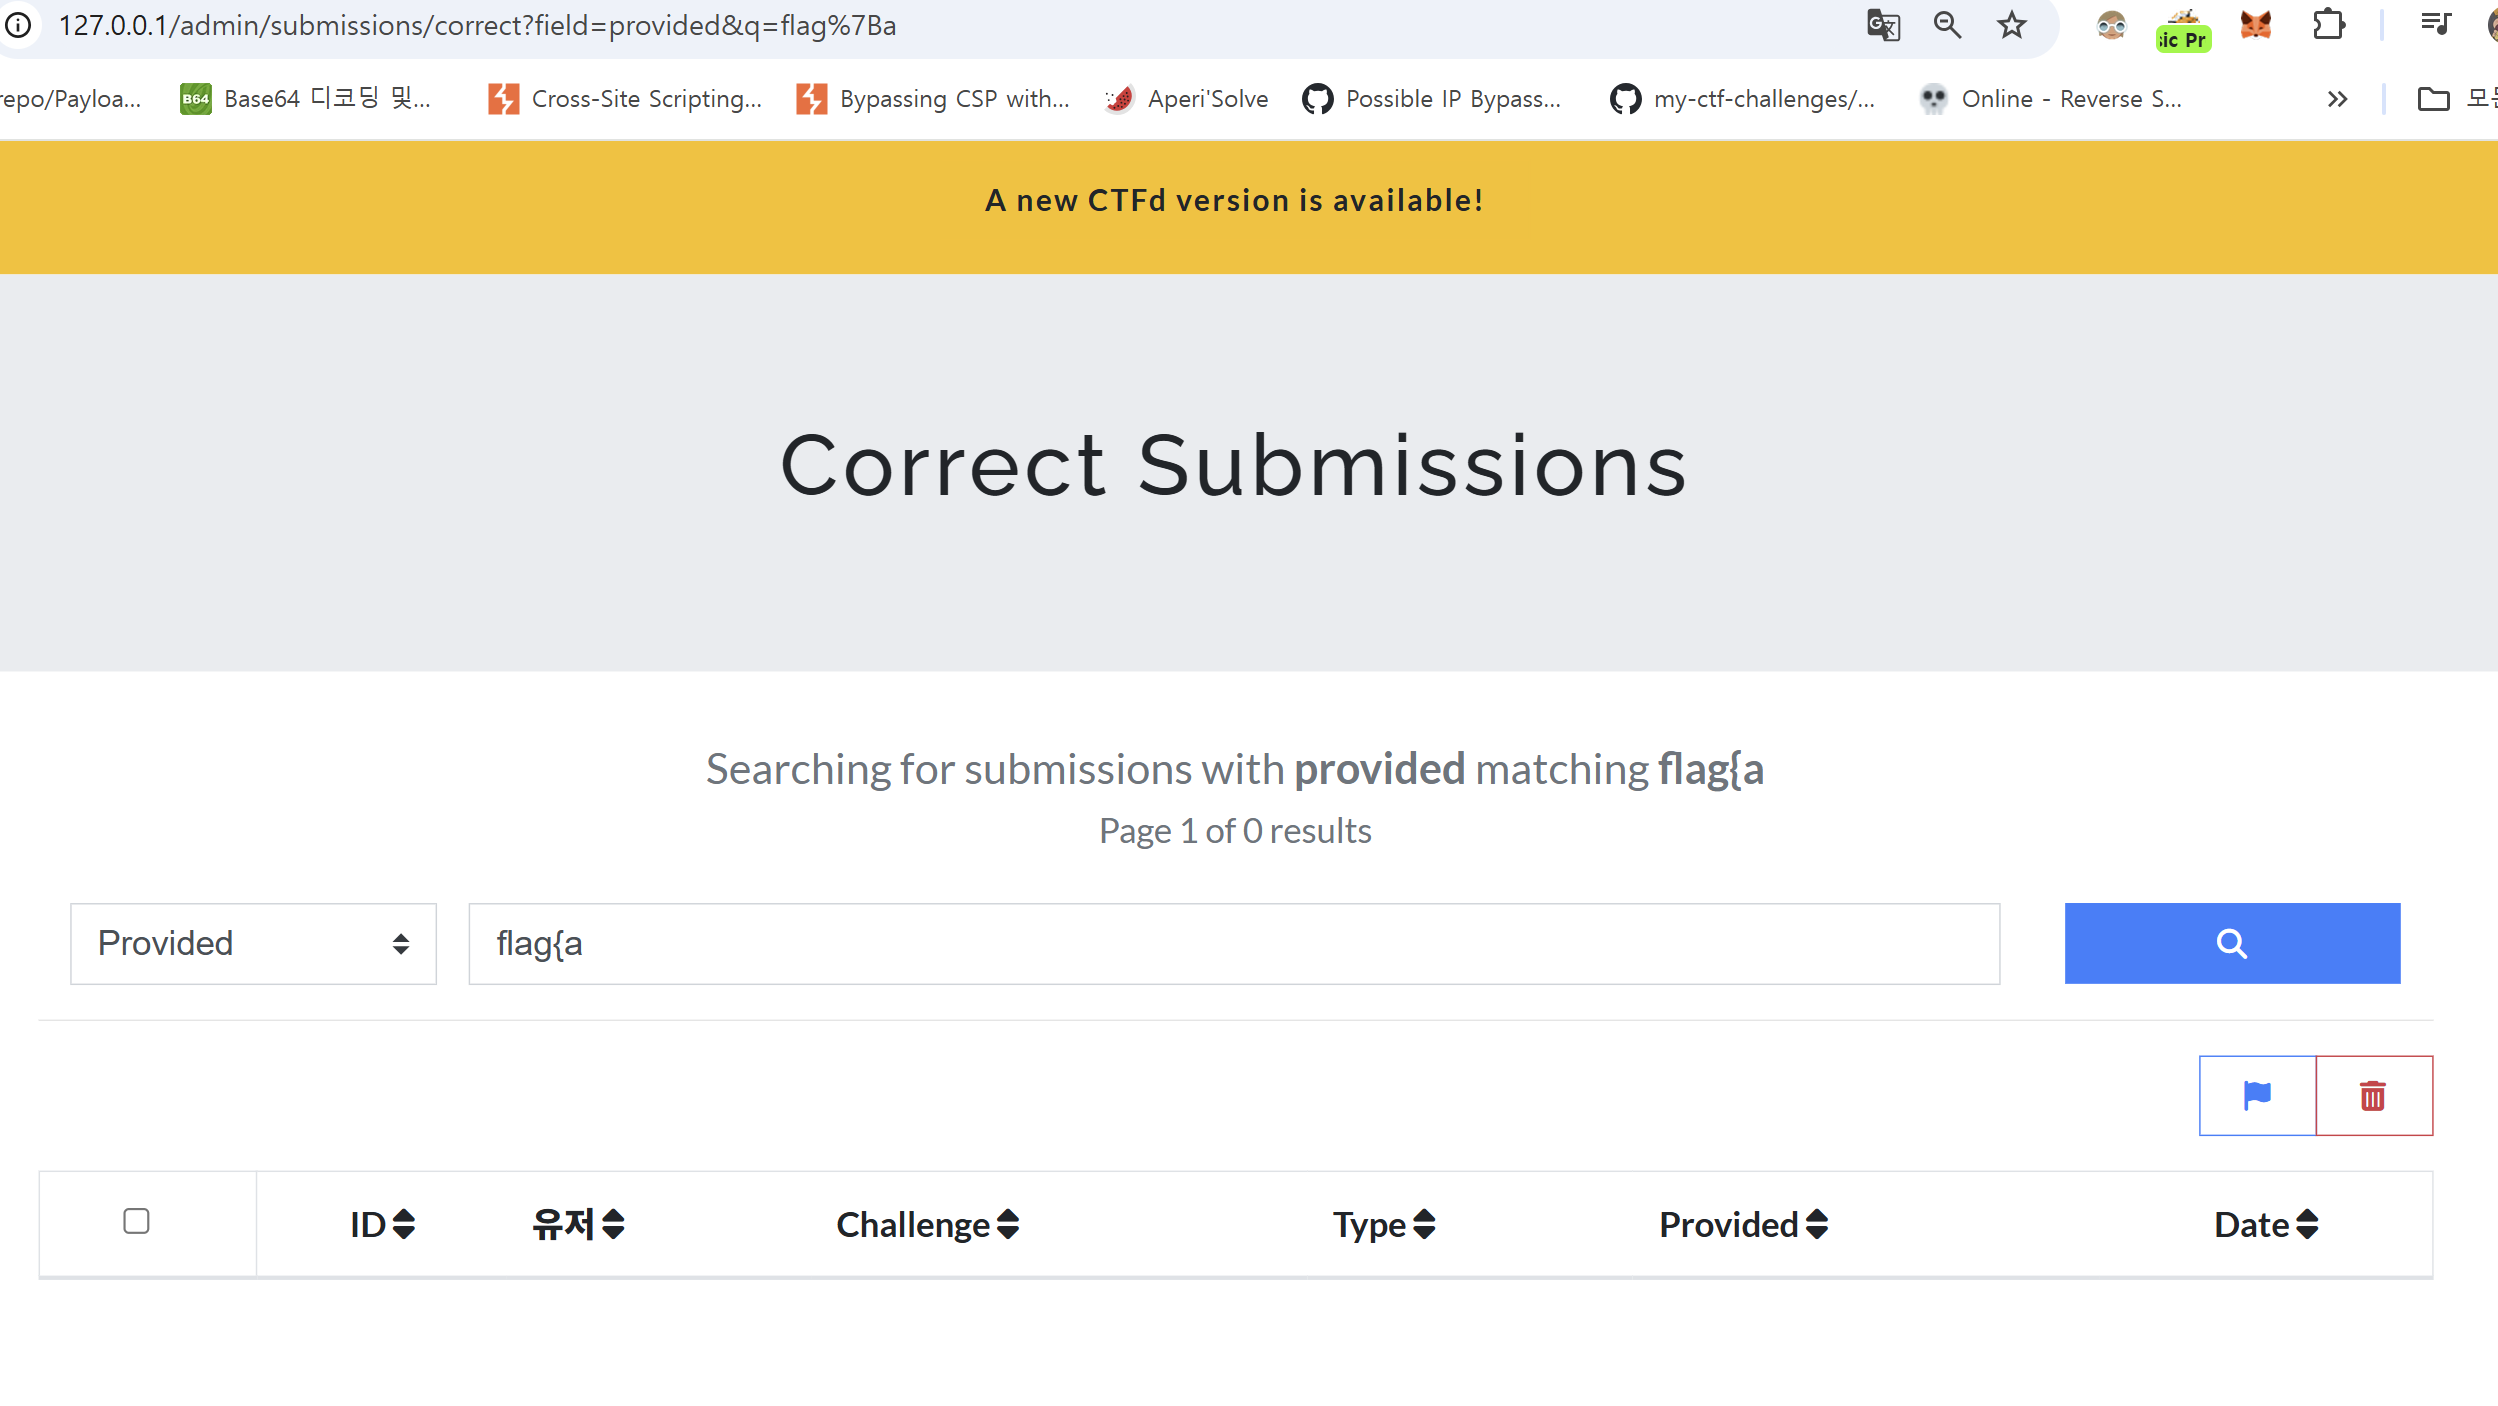
If you enter a value that does not match the flag, an empty table page is displayed.
Here, by inspecting the URL query you can see that the search term is placed in the q parameter. But what happens if you perform the search while on page 2?

Returns 404error for flag search values that do not match where page is 2.
Under normal circumstances, it should return an empty table (just like when page=1), but when you request page>=2, it instead returns a 404 Not Found error. An attacker can then combine this behavior with the :visited CSS trick described above to exfiltrate the flag.
The overall attack flow is as follows:
- Ensure the “Correct Submissions” page has at least two pages. (CTFd paginates 50 submissions per page, so you need a challenge with more than 50 correct solvers to get to page 2.)
- Craft a URL of the form:
/admin/submissions/correct?page=2&field=provided&q={partial_flag}and trick the admin into visiting it. - When the admin revisits that URL, check whether the link is styled with the :visited CSS pseudo-class. If it is, the request returned 200 OK, confirming that the injected q value (the partial flag) matches.
However, modern browsers have strict restrictions on direct access to the :visited property. Therefore, instead of directly finding the :visited property, an attacker can use CSS techniques such as mix-blend-mode to trick the user into clicking on a different colored URL to leak data.
The CTFd platform has been modified since version 3.7.2 to no longer return a 404 error even when there are more than 2 pages.
https://github.com/CTFd/CTFd/commit/c8df40067ce6288b6b5e74c02dcf2fddd4265847
Mitigation
Setting the X-Frame-Options header to DENY or SAMEORIGIN prevents loading a cross-origin site in an <iframe>. This stops an attacker from overlaying the victim’s site in an iframe and faking the UI via CSS or opacity tricks, because the browser will refuse to render the iframe in the first place.
Also, the simplest defense is to disable the browser’s history feature entirely. In Firefox, you can turn off :visited styling altogether by setting the layout.css.visited_links_enabled option to false.
Navigations
Background
Determining which cross-site requests were made, which pages were loaded, and what navigations were triggered is extremely valuable to an attacker. Because the site returns different responses depending on the user’s state, an attacker can extract a variety of information by observing those navigations.
Download Trigger
When serving a download endpoint, you typically include the header:
Content-Disposition: attachment
By setting this header, the browser is instructed to download the response as a file attachment instead of navigating to it directly.
You can detect whether a download occurred using the following code.
1 | const leak = (url) => { |
When a download is triggered—that is, when the response header is set to
Content-Disposition: attachment
the browser doesn’t actually navigate to any page, but instead returns only the file attachment. As a result, frame.contentWindow.location.href will be set to "about:blank". In other words, if you try to initiate a download inside an <iframe>, the iframe will not fire its onload event. Since "about:blank" doesn’t violate the Same-Origin Policy, the code inside the try block executes safely. However, if you load a normal page without an attachment, that navigation does violate SOP and throws, so execution falls into the catch block. This lets you detect whether a download navigation actually occurred.
If you want to prevent the browser’s download dialog from appearing to the user, you can add:
iframe.sandbox = 'allow-scripts allow-same-origin allow-popups';
※ Instead of checking frame.contentWindow.location.href, you can also inspect properties like iframe.contentWindow.frames[0].origin.
Server-Side Redirections : Max Redirection
When a browser receives a response with a 3 XX status code, it automatically follows the redirect. In Chrome, the redirect chain is limited to 20 hops. You can exploit this limit to infer whether a cross-origin page performs its own redirects:
- On the attacker-controlled page, create a redirect chain that follows 19 hops.
- Make the 20th (final) hop lead to the target page.
3-1. If the target loads successfully with no errors, it means the target page itself did not issue any further redirects.
3-2. If an error event is triggered instead, the target page attempted at least one additional redirect, surpassing Chrome’s 20-hop limit.
Server-Side Redirects : Inflation
The “inflation” technique detects whether a redirect occurs by artificially enlarging the URL. On most platforms, a redirect adds the destination URL to the query string, increasing the overall length. If you craft an initial URL that is already close to the maximum allowed length, any extra characters added during a redirect will push it past the limit and cause an error. By observing whether this length-based error appears, you can determine whether a redirection happened.
The inflation technique is divided into server-side and client-side.
- Server-Side Errors
To apply this on the server side, you must first find the server’s maximum allowable URL length. Because this limit varies from server to server, you can discover it by performing a binary search over the URL length.
1 | const maxLen = 99999999; |
The search continues until error events occur, in the same manner as the code above.
Client-Side Errors
Unlike the server-side approach, this method deliberately triggers an error in the client-side
Chrome, for example, enforces a maximum URL length of about 2 MB. If navigation exceeds this limit, the browser stops loading and falls back to a safe page such as
about:blank.Here, the
#fragmentportion of the URL is especially useful.Assume
https://victim.comautomatically redirects tohttps://victim.com/next.If you request
https://victim.com#aaaa, the redirect produceshttps://victim.com/next#aaaa.Because the fragment is preserved after the redirect—and counts toward the total URL length—you can use it to overflow the limit.
By crafting a fragment whose length is (max-URL-length − 1), the redirect pushes the final URL past Chrome’s limit, triggers an error, and lets you determine whether a redirect occurred.
1
2
3
4
5
6
7
8const L = 2_097_152; // Chrome limits
const pad = "A".repeat(L - 1 - 24); // 24 = Fixed length of domain etc.
const url = `https://victim.com#${pad}`;
const img = new Image();
img.onerror = () => console.log("redirect → Overlength detection");
img.onload = () => console.log("redirect doesn't exist");
img.src = url; // cross-originAdditionally, because the browser falls back to about:blank when the limit is exceeded, an attacker can test for same-origin access to that page. If
about:blankis reachable from the current context, it indicates that the redirect triggered the overflow; if it is not, no redirect occurred.
Probing Cross-Site Redirection by using CSP
You can also turn Content Security Policy (CSP) to your advantage to detect cross-site redirects. When a connect-src directive is in force, any fetch that gets redirected to a cross-site endpoint not allowed by connect-src violates the policy, causing the browser to fire a SecurityPolicyViolationEvent.
1 | <meta http-equiv="Content-Security-Policy" content="connect-src https://example.com"> |
Beyond connect-src, you can use other CSP directives—such as script-src—to perform the same check.
1 | <meta http-equiv="Content-Security-Policy" |
If a site’s redirect behavior varies based on cookie values, you can detect it with the form-action directive. This still works when the cookie is sent with SameSite=Lax, allowing you to track the redirect.
1 | <meta http-equiv="Content-Security-Policy" |
Probing Cache
There’s a very simple way to tell whether the current page was served from cache: measure its load time. A cached page is retrieved from disk, so it invariably loads faster than one fetched from the network. However, this is only a first-pass check—if the timing gap between cached and uncached loads is small, the method may fail to distinguish them.
1 | const probeCached = (url) => |
Using a 20 ms threshold, treat any page that finishes loading within that window as “cached.” If the load completes in under 20 ms, you can access checker.origin without error. If it takes longer than 20 ms, the page is presumed uncached, the checker script never loads, and trying to read checker.origin throws an error.
This is only a coarse heuristic: a truly cached page must consistently load in < 20 ms while an uncached one must consistently exceed that, and real-world latencies vary with server conditions and client hardware. If another weakness—such as a DoS vector—is available, combining it with this timing test can make detection more reliable.